Create new tabs for existing editors
When working with the different entities in Ucommerce admin, you have the option to add additional tabs to each view, so that you can integrate your own user controls in Ucommerce admin.

Configuring Tabs
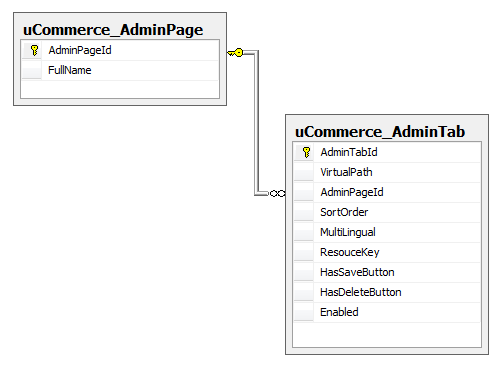
To add more tabs to a view, you need to go to the database, and add your tab to the ucommerce_admintab table. To find out which view (page) the tab is related to, take a look at the ucommerce_adminpage table.
The following table contains the columns in ucommerce_admintab which should be of interest to you:
| Column | Description |
|---|---|
| VirtualPath | The virtual path of your user control (.ascx). The path is relative to the page you want the tab to appear on. Note that you can use both ~/ and ../. |
| AdminPageId | The page where the tab should be placed on, defined in ucommerce_adminpage. |
| SortOrder | Defines how the tabs for the page should be ordered. |
| Multilingual | If set to true, one tab of the type is added per language configured in Umbraco. Note: Multilinual tabs should implement the IMultilingual interface – more about this later. |
| ResourceKey | Put the text on your tab here. This will be overriden by the language name if you specify your tab to be multilingual. |
| HasSaveButton | If set to true, the save button will be visible on the toolbar for this tab. |
| HasDeleteButton | The same as HasSaveButton, only for a delete button. |
| Enabled | Yes, you can both enable and disable tabs. |
Implementing User Controls For Use On Tabs
To create the user control you want on your new tab, simply create a new project in Visual Studio, create a
reference to UCommerce.Presentation.dll, create a new user control, and make that user control inherit from
UCommerce.Presentation.Web.ViewEnabledControl
your control to appear on. This is necessary so that they can interact.
You’ll find a list of the most commonly used view here:
| View | Interface |
|---|---|
| Edit product catalog group | IEditProductCatalogGroupView |
| Edit product catalog | IEditProductCatalogView |
| Edit category | IEditCategory |
| Edit product | IEditProduct |
| View order | IViewOrderGroupView |
There are one for each view in Ucommerce, and should be pretty easy to find. Let me know if there is one you can’t find.
From your user control, there are two events that is of interest to subscribe to:
    event EventHandler<EntityCommandEventArgs<T>> Saving;
    event EventHandler<EntityCommandEventArgs<T>> Saved;
The Saving event is raised before the main entity (e.g. Product on IEditProductView) is saved, and the Saved event is raised after the main entity has been saved. If you want to modify the main entity before it is saved, do it at the Saving event. The EntityCommandEventArgs
For some views, you can also subscribe to these two events, which are raised when deleting the entity – they are handy for doing some cleanup:
    event EventHandler<EntityCommandEventArgs<T>> Deleting;
    event EventHandler<EntityCommandEventArgs<T>> Deleted;
From your user control, you also have access to the view itself using the View-property on the ViewEnabledControl
Creating Mutlilingual Tabs
As previously mentioned, you can make your tabs multilingual by implementing the IMultilingual interface. By doing this, one tab containing your user contorl will appear for each language configured in Umbraco. The CultureCode property will automatically be set to the culture code of the language for the tab.
    /// <summary>
    /// Contains definition for a multi lingual class.
    /// </summary>
    public interface IMultiLingual
    {
        /// <summary>
        /// The culture code.
        /// </summary>
        /// <example>
        /// da-DK for Denmark, en-GB for Great Britian etc.
        /// </example>
        string CultureCode { get; set; }
    }
Custom Initialization On Tabs
If you want custom initialization on your tab, you can implement the ISection interface.
    /// <summary>
    /// Defines a UI section.
    /// </summary>
    public interface ISection
    {
        /// <summary>
        /// Returns <see cref="ICommand">commands</see> for this section.
        /// </summary>
        /// <remarks>
        /// This is where the menu should be initialized.
        /// </remarks>
        IList<ICommand> GetCommands();

        /// <summary>
        /// Gets a value indicating whether or not this section should be displayed.
        /// </summary>
        bool Show { get; }
    }
If, for example, you want to add your own custom button to the toolbar, you can do it like this:
    public void IList<ICommand> GetCommands()
    {
    	var commands = new List<ICommand>();

    	commands.Add(new ImageCommand(x => OnClickAction())
    		{
    			Icon = "images/ui/add.png",
    			Text = "My Button"
    		});

    	return commands;
    }
Summary
When you are done with your user control, copy the .ascx to the path you have specified in ucommerce_admintab, copy the dll to the /bin folder, and your new tab should be ready for use.
Extending the admin UI is not something you would for every solution, but if you have the need, it can add great value for your client.
