Product Configurator
Step 4: Build the Configurator
With the previous steps concluded we’ve got the required information set up in the catalog and now we’re ready to present the options.
First we’ll load up the product that we wish to configure. Of course it would typically come from a listing, but we’ll just grab it directly to get to the point.
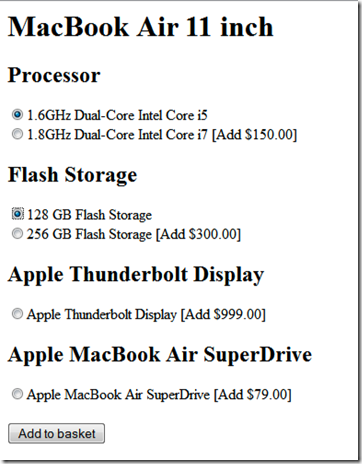
Finally we’ll grab the “Option” relations and present them in a list. Here’s what the Razor code in Umbraco will look like.
    @using UCommerce.EntitiesV2;
    @using UCommerce.Runtime;
    @{
        // Grab a price group to work from
        var priceGroup = ProductCatalog.All().Single(x => x.Name == SiteContext.Current.CatalogContext.CurrentCatalogName).PriceGroup;

        // Load MacBook Air product
        Product macbookAir = Product.All().Single(x => x.Sku == "MacBook-Air-11-inch");

        // Load options relationship kind
        ProductRelationType optionRelation = ProductRelationType.All().Single(x => x.Name == "Option");

        // Load the product options, "Option" relation kind only
        var options = macbookAir.GetRelatedProducts()[optionRelation];
    }

    <h1>@macbookAir.Name</h1>
    <form>
    <input type="hidden" name="masterSku" value="@macbookAir.Sku"/>
    @foreach (Product option in options)
    {
        <h2>@option.GetDescription("en-us").DisplayName</h2>
        if (option.ProductDefinition.IsProductFamily())
        {
            foreach (Product selectableOption in option.Variants)
            {
                <input type="radio" group="@option.Name" name="SKU,@option.Sku" value="@option.Sku,@selectableOption.VariantSku">@selectableOption.GetDescription("en-us").DisplayName</input>
                if (selectableOption.GetPrice(priceGroup).Price > 0)
                {
                    <span>[Add [email protected](priceGroup).Price.Value.ToString("#.00")]</span>
                }
                <br />
            }
        }
        else
        {
            <input type="radio" group="@option.Name" name="SKU,@option.Name" value="@option.Sku">@option.GetDescription("en-us").DisplayName</input>

            if (option.GetPrice(priceGroup).Price > 0)
            {
                <span>[Add [email protected](priceGroup).Price.Value.ToString("#.00")]</span>
            }
            <br />
        }
    }
    <br />
    <input type="submit" value="Add to basket" />
    </form>

Summary
Creating and maintaining highly configurable products in Ucommerce is a perfect way to offer up nice customization opportunities for customers.
By using the out of the box capabilities like product definitions, relationship kinds, and relationships combined with the API you can build a rich product configurator, which will present product options dynamically based on the options attached to any given product.
Also doing configurable products like this is a great way to manage inventory of individual components instead of complete product configurations. This means that less inventory is required because any given option might be part of multiple different product configurations thus inventory will seem higher with this approach.
In this article you saw how we can use Ucommerce to build an Apple-style configurator, but this technique can be further extended to present even more complex decision trees if required.
Imagine building the options themselves with sub-options by doing deeper relationships. This way you can support some very complex scenarios and have complete decision trees for product with very different options, e.g. triple-play service providers of TV, phone, and internet services, which require very different configuration for each option.
