
Sending E-mail using Ucommerce
Any good e-commerce solution lets the store owner stay in contact with customers. One of the most well established ways of doing this is using the tried and true e-mail.
A strength of the integration between Ucommerce and Umbraco is that Umbraco is particularly good at building nice looking pages so we thought, “why not use this to build e-mails as well?”, so that’s what we did. The great thing about this approach is that you don’t have to learn some obscure templating language to style your e-mails, you simply build your e-mail content like you would build any other page in your solution using XSLT or .NET user control, whichever suits you the best.
Steps Involved in Sending E-mail
To send e-mail you’ll need to:
- Add the types of e-mails you’ll be working with in Ucommerce
- Set up a profile for your store to use
- Configure the actual e-mails and their templates using Umbraco
- Configure your store to use that profile
- And finally trigger the e-mail from XSLT, a pipeline, or .NET
Adding a New E-mail Type
Ucommerce employs the notion of E-mail Types, which are your basic kinds of e-mails that you’re working with. Out of the box a single type is supplied called “order confirmation”, but you can configure your own types as needed.
Other types might include “Welcome new customer”, “Thank you signing up to the newsletter”, or more business-like type e-mails like “Your items are shipping” or “Invoice”.
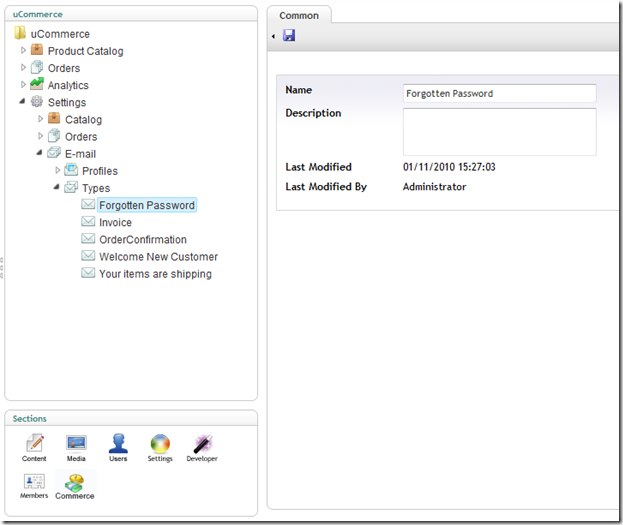
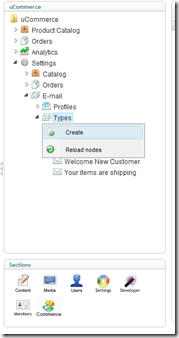
To set up a new e-mail type you need to go to Settings => E-mail => Types, right click Types, and click Create.
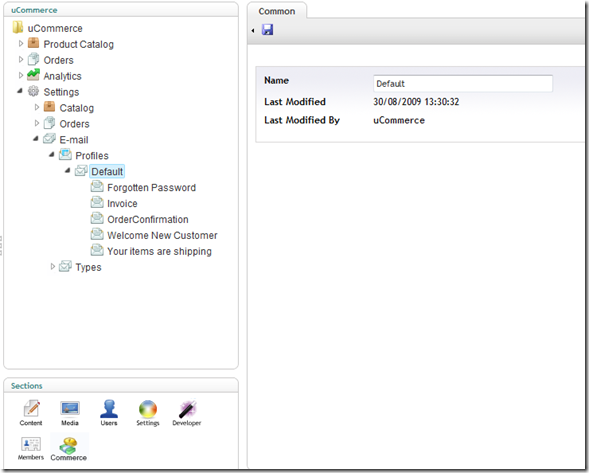
Add an E-mail Profile
“What’s an E-mail Profile and why do we need one?”, you might ask.
Ucommerce supports multiple stores in a single installation and these stores might vary wildly in look and feel so we needed a way to set up multiple instances of the same e-mails on a per store basis to match that same look and feel from store on e-mails across different stores, e.g. an invoice for Store A might have a different look and feel than an invoice for Store B. Thus the notion of an E-mail Profile was introduced to group e-mail instances together for use on individual stores.
As you can see from the screenshot below the profile has an e-mail instance associated per e-mail type created previously. The difference being that for an E-mail Profile we’re dealing with an actual e-mail while an E-mail Type is a placeholder. The system basically ensures that we’re dealing with the same e-mail setup across all stores and makes it easier to deal with in code.
The process of creating a new profile is the same as you just used to create an E-mail Type.
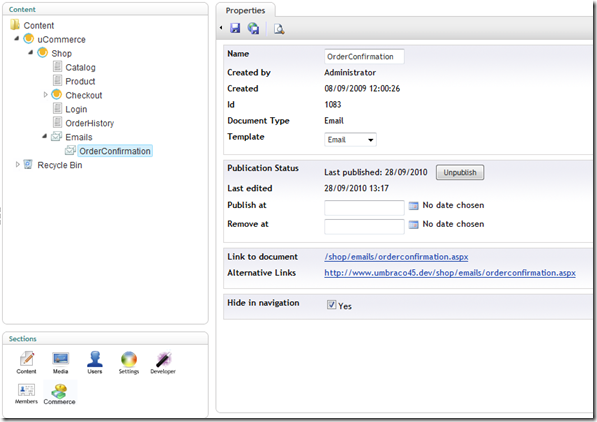
Create the E-mail Content in Umbraco
As mentioned previously e-mail is generated using Umbraco using content nodes, templates, macros, and/or user controls. Ucommerce comes with a single Umbraco page out of the box: Order Confirmation, but really you can use any content node in Umbraco.
Each e-mail is language enabled so if you need multiple language variations of your e-mail you can set up a content node for each language you wish to support.
The template of your content node can be used to load information particular to the e-mail you’re sending by using macros. By use of a little magic Ucommerce will provide the content page with a query string parameter named “orderGuid”, which will give you context information to load data.
Lets say that we’re building an order conformation e-mail and assume that we’re receiving the order guid in our query string. The code to load data would look as follows in either .NET or xslt:
    <!-- The query string param will always be 'orderGuid', but may contain additional parameters like a customer number or product id -->
    <xsl:variable name="orderGuid" select="umbraco.library:RequestQueryString('orderGuid')"/>
    <xsl:variable name="cart" select="CommerceLibrary:GetPurchaseOrder($orderGuid)"/>
    <!-- code for formatting the contents of the $cart variable -->
    private PurchaseOrder GetOrderForEmailContent()
    {
        return PurchaseOrder.FirstOrDefault
            (x => x.OrderGuid.ToString() == HttpContext.Current.Request.QueryString["orderGuid"]);
    }
Configure Contents of E-mail
Going back to Ucommerce you need to specify which content node Ucommerce is to use when generating the e-mail.
First you’ll set up the basics of the e-mail such as the name the e-mail is coming from and sender address and optionally whether the e-mail is to CC or BCC’d to anyone, e.g. stores owners like to get an e-mail notification when new orders roll in and this is the perfect use case for CC and BCC.
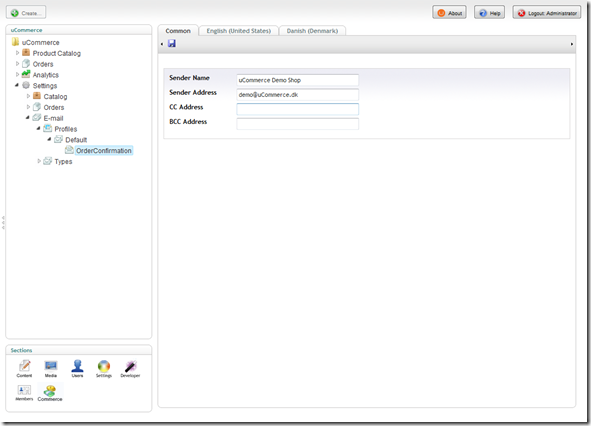
Next up you’ll configure the multilingual pieces of the e-mail like the subject and the contents of the e-mail, which you set up in a earlier step.
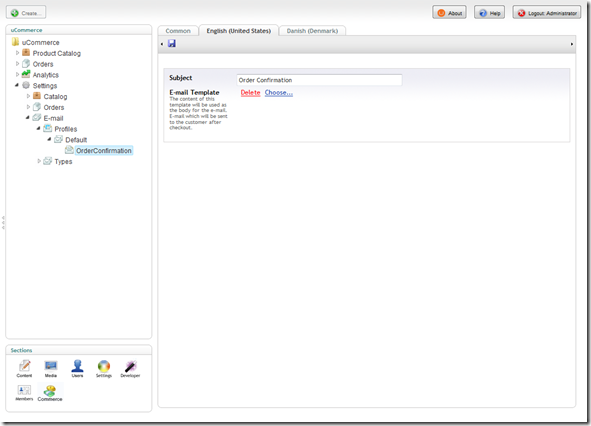
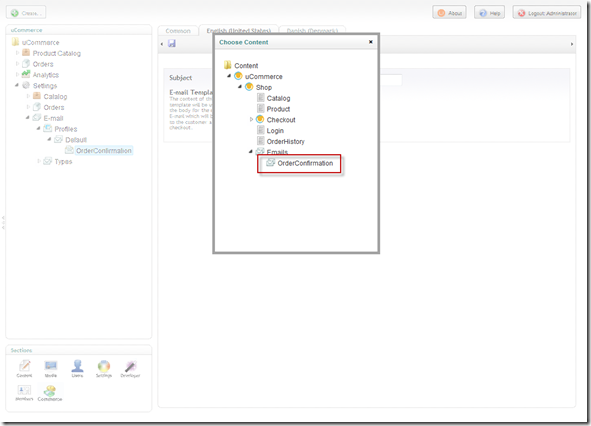
Select the template in Umbraco using the content picker. Please note that this might be any content node in Umbraco; OrderConfirmation is used only as an example.
You can specify dynamic subjects of your e-mails, which are populated by the e-mail parameters sent to the e-mail service. To do this you use the e-mail parameters surrounded "{}", so to use the "ordernumber" parameter you specify "{ordernumber}" in the subject line.
You can specify additional parameters for the EmailService when calling it from .NET. This is covered in the next section.
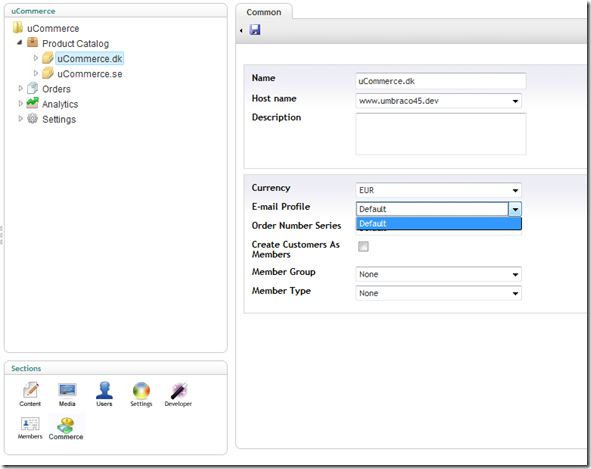
Configure Your Store to use an E-mail Profile
Once you’re happy with the e-mails in your installation you’re ready to tell your store to use those e-mails. To do so go to Product Catalog =>
With this step completed Ucommerce will know which e-mail and template to select when you ask it to send a particular e-mail type in a given store. More on that in the next step.
Send the E-mail
Now you’re ready to tie it all together and send the e-mail to the customer. As with most APIs in Ucommerce you can go with either XSLT or .NET when you want to trigger the e-mail. Use whatever makes sense in your particular scenario.
Using XSLT you can use the following to trigger our order confirmation template from before:
    	<xsl:variable name="orderGuid" select="CommerceLibrary:GetBasket()/purchaseOrder/@orderGuid"/>
    	<xsl:variable name="result" select="SendEmail('OrderConfirmation', $orderGuid)"/>
The XSLT extension “SendEmail” used above actually uses a class called EmailService to do its thing.
You can leverage this same class in .NET or pipeline yourself with the following code:
    // Get the services required for sending e-mails
    var emailService = ObjectFactory.Instance.Resolve<IEmailService>();
    var localizationContext = ObjectFactory.Instance.Resolve<ILocalizationContext>();

    // Find the relevant e-mail profile for the current store
    var emailProfile = SiteContext.Current.CatalogContext.CurrentCatalogGroup.EmailProfile;

    // Load information for e-mail personalization
    var purchaseOrder = SiteContext.Current.OrderContext.GetBasket().PurchaseOrder;

    // Set up personalization parameters - params will be passed to
    // the configured e-mail template
    var queryStringParameters = new Dictionary<string, string>();
    queryStringParameters.Add("orderGuid", purchaseOrder.OrderGuid.ToString());
    queryStringParameters.Add("customerId", purchaseOrder.Customer.CustomerId.ToString());

    // Send e-mail
    emailService.Send(localizationContext,
                        emailProfile,
                        "OrderConfirmation",
                        new MailAddress(purchaseOrder.BillingAddress.EmailAddress),
                        queryStringParameters);
Please note that both examples assume that you’ve added a billing address to the basket prior to sending e-mail. Keep in mind that Ucommerce uses standard .NET SMTP to send the e-mail so you will have to configure the SMTP server you want to use in web.config.
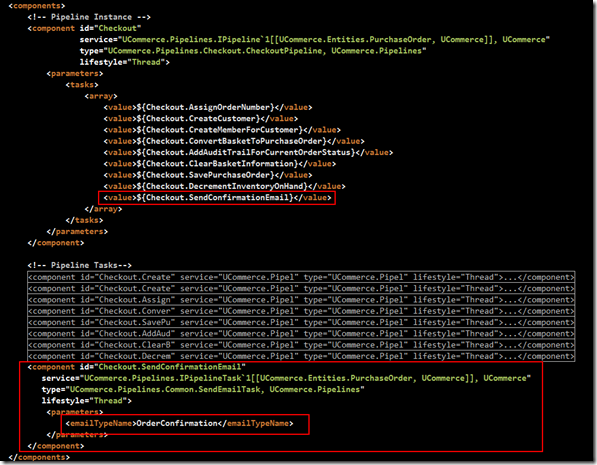
As of Ucommerce 1.1.1.0 you can use a standard pipeline task to send e-mails. Simply edit the relevant pipeline configuration and add SendEmailTask to the flow. When Ucommerce 1.1.1.0 is installed OrderConfirmation is added as a default. If you need to send other e-mail types you see how to configure them by taking a look at /ucommerce/pipelines/Checkout.config.
You can tell Ucommerce to send a different type of e-mail by specifying an e-mail type name as shown in the screenshot below. Just replace “OrderConfirmation” with the name of your e-mail type; this is the name that you used when you created your e-mail types in a prior step.
With that you’ve sent your first e-mail with Ucommerce.
Wrap Up
The process of sending e-mail with Ucommerce does require a couple of steps to get going, however, in return you get the full power of Umbraco as a content management system to fully style your e-mails thus avoiding to have to learn some arcane templating system.
In addition you can even take advantage of some more advanced macros within Ucommerce. Think of the value of sending out your order confirmation e-mail, not only with the details of the order, but with added information about related items to each item bought or special offers tailored to the customer.
This is the value of having the CMS and Ucommerce handle your store e-mails.