
Extend Marketing Foundation: Add a Advertise and Act Target
Ucommerce comes with a bunch of built-in targets that you can use to set up new campaign items to target things like the amount of a certain item a customer has to buy, tha the customer has to purchase for more than x amount, from a certain category, a certain product, etc., but you can extend Marketing Foundation with your own targets as well.
To build a new target you have to deal with three concerns:
- Business logic, this is the target itself
- User interface, the UI a customer will use to configure your target
- Data access, creating new instances of your target and loading existing ones
“Buy More Than”-target
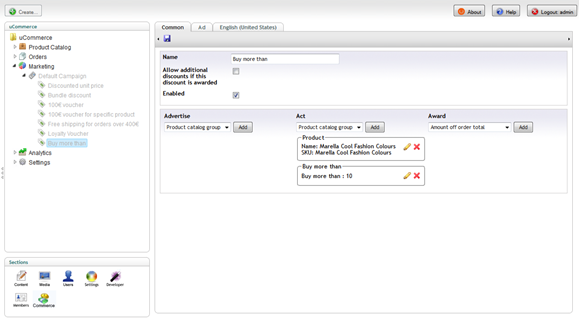
In this article you will learn how to extend Marketing Foundation with a “Buy more than”-target, which is what Ucommerce calls an Act target. The “Buy more than”-target will be an order line level target, which will be combined with a “Buy product”-target to create a discount triggered.
It can be used stand-alone as well in which case the customer just needs to “Buy more than” of whatever product she decides. Not the most common discount type, but it does show the power of being able to combine targets.
Advertise and Act Targets
Ucommerce supports two kinds of targets: The advertise target and the act target. Display targets are used in the process of targeting campaign items for specific customers, i.e. these are the ones you set up under the “Advertise” section of a campaign item.
Act targets are evaluated against a cart to determine whether the customer actually “acted” the way we wanted them to and thus trigger an award.
A target might be either an advertise target, an act target, or both, e.g. a product target is actually both an advertise target and an act target as it works for both scenarios.
As mentioned advertise targets are used to determine which campaign items a customer should see using the API:
IList<CampaignItem> targetedCampaignItems = MarketingLibrary.GetTargetedCampaignItems();
Act targets are executed by the basket pipeline using the pipeline task Basket.ApplyAwards.
Our “Buy more than”-target will be an act target targeting individual order lines. Before we get to that though let’s take a look at what’s required to create an advertise target or IDisplayTarget as they’re called internally in Ucommerce.
Implementing IDisplayTarget
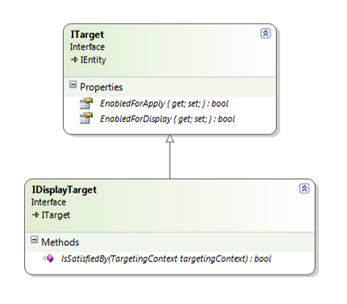
To implement a display target you’ll implement the interface called IDisplayTarget, which has a single method called IsSatisfiedBy. This is the method invoked by Ucommerce to determine whether the target is satisfied by the current targeting context.
Basically you’ll evaluated the targeting context and see if it fits with what you want your target to do, e.g. is the customer viewing a particular product, is the customer logged, etc..
Pretty simple.
A Word On The TargetingContext
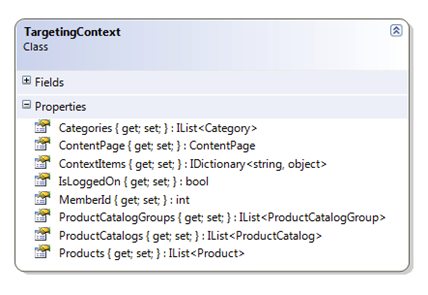
The targeting context is gathered by Ucommerce during runtime and tells you all manner of interesting information about what the customer is currently viewing, e.g. what’s the current page, store, catalog, category, list of products being viewed, etc.. You can add your own information to the targeting context if you require additional information. We’ll cover that in another article.
Implementing An Act Target: IPurchaseOrderTarget, IOrderLineTarget
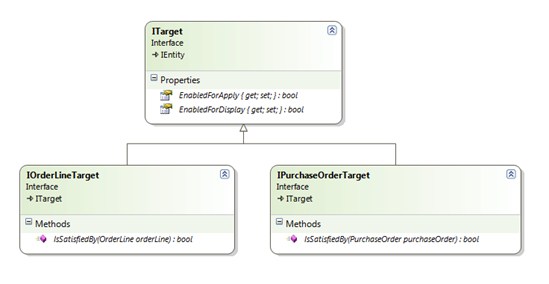
Act targets are evaluated against the customer’s cart to verify that the customer actually bought or did what we wanted her to do. You can opt into two interfaces depending on whether you’re targeting the entire order or individual order lines: IPurchaseOrderTarget and IOrderLineTarget.
For our “Buy more than” target we’ll implement the IOrderLineTarget because that’s where we’ll find the quantity of a particular item. Our new “Buy more than”-target would probably be combined with a “Buy this product”-target in most cases, which would require a customer to buy a certain amount of the product.
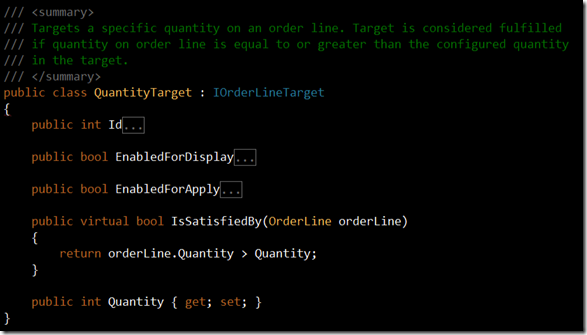
As you can see the logic is pretty simple. We’re receiving an order line from Marketing Foundation and our job is to figure our whether the target is satisfied by this particular order line. In our case the customer just needs to buy more than the configured quantity on the our target.
This leads us to the next question: How do we actually configure a target? Enter the ITargetUi and IConfigurable…
Implementing Configuration UI for the Target
The configuration UI for our new target is responsible for creating a new instance of our particular target and saving it the data store of your choice. Also it serves to reconfigure existing targets of the type that we’re working with; in this instance QuantityTarget.
To add a config UI for our new target we need to create a new user control in .NET. Let’s put it in /umbraco/ucommerce/marketing/targets, which is where the standard target UIs are located. Also remember to put the generated DLL in the /bin folder.
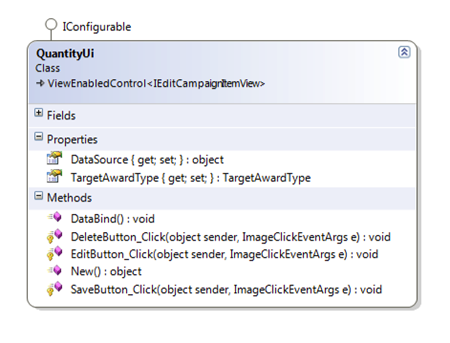
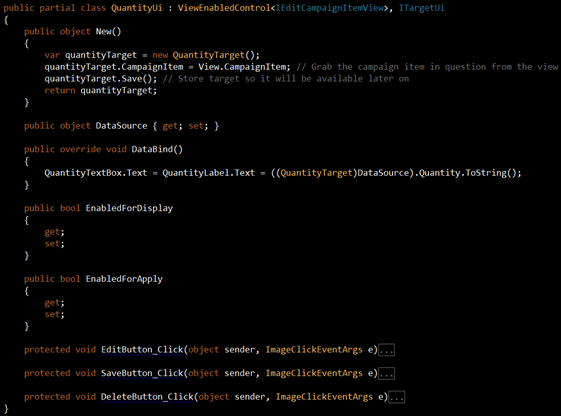
Our user control needs to plugin into the UI framework defined by Ucommerce. All that’s required to do so is to inherit ViewEnabledControl
Inheriting ViewEnabledControl
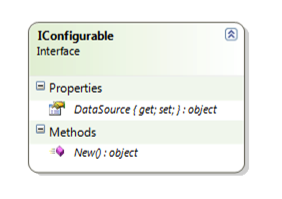
IConfigurable is the interface which lets Ucommerce create your target and subsequently reconfigure it when a user wants to edit it.
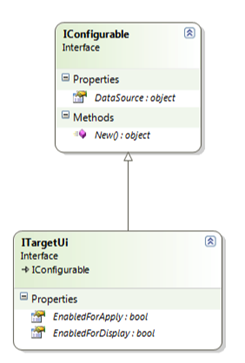
For our target we need a specialized version of IConfigurable called ITargetUi. This is due to the fact that the target might be used as both an advertise target, an act target, or both.
Ucommerce will tell you whether it’s one context or the other by assigning the EnabledForDisplay and EnabledForApply values on your UI.
So our user control ends up looking like this. Please note that the New() method acts not only as a factory method for our target, but has the responsibility for storing that instance in the data store also. If this doesn’t happen the instance is lost and won’t be displayed as part of the campaign item.
Before we can actually use the control we need to register it with Ucommerce.
Register Target Configuration UI
To add the target UI to Ucommerce we’ll add it to the table called Ucommerce_EntityUi. This table holds the mapping between the type, which is to be configured, i.e. our QuantityTarget, and our UI to do the configuration, i.e. our QuantityUi.ascx user control.
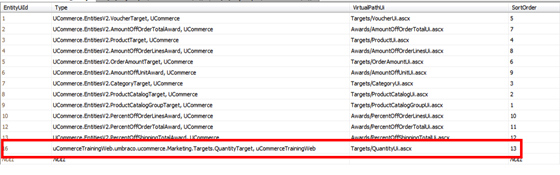
Because Ucommerce is multilingual we’ll want to add a description of the new UI in the table Ucommerce_EntityUiDescription otherwise the target UI will show up blank in the drop down lists.

When the “Add” button is clicked our new target UI is added to the campaign item and the New() method is called on our user control thus creating a new instance of the target we’re configuring.
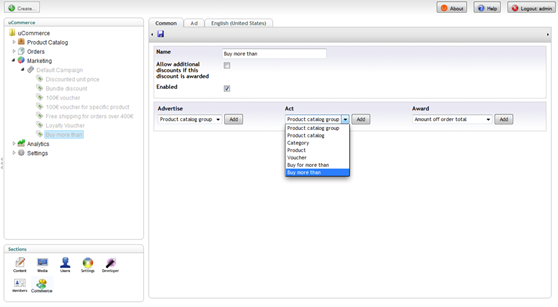
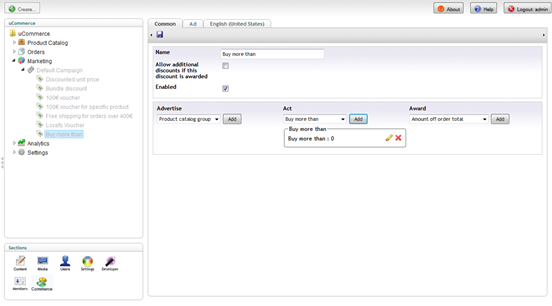
With that in place our new UI is now available when setting up new campaign items and we can create new quantity targets, so we’re ready to move on to dealing with existing targets.
Feeding Marketing Foundation with Targets using TargetAggregator
With the previous steps complete we need to deal with existing targets so Marketing Foundation can find them and evaluate them for customers entering the site: Enter the TargetAggregator.
TargetAggregator is responsible for finding targets for any given campaign item configured in Marketing Foundation.
    var targetAggregator = ObjectFactory.Instance.Resolve<ITargetAggregator>();
    IList<ITarget> targets = targetAggregator.GetTargets(campaignItem);
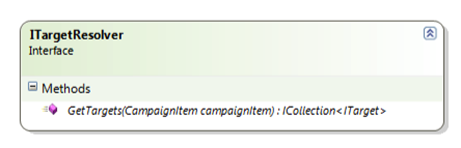
TargetAggregator relies on individual TargetResolvers to find targets for a campaign item, e.g. Ucommerce has a single target resolver called DefaultTargetResolver, which handles the built-in targets.
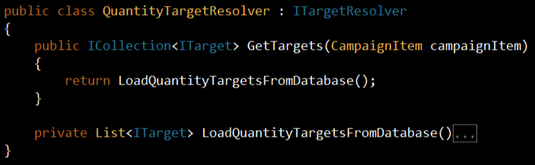
We’ll build a custom target resolver by implemeting the ITargetResolver. It will handle our Quantity target and any other future targets.
Thus our QuantityTargetResolver ends up looking like this:
Register Custom Target Resolver with TargetAggregator
At this point Ucommerce doesn’t know about our custom target resolver yet so we’ll have to tell it about it. This is done by adding a new file to Ucommerce/Apps/MyApp called Marketing.config with the following component:
    <configuration>
    	<components>
    		<component
    			id="QuantityTargetResolver"
    			service="UCommerce.Marketing.Targets.TargetResolvers.ITargetResolver, UCommerce"
    			type="UCommerceTrainingWeb.umbraco.Marketing.Targets.Quantity.Library.MyPaymentService, UcommerceTrainingWeb" />
    	</components>
    </configuration>
With the new target resolver registered Marketing Foundation will pick it up and start population targets using it.
That’s it. Our new target is good to go and will act exactly as the built-in targets, which ship with Ucommerce.
Persisting Data
The last missing piece is the ability to persist data for your custom target. In order to do that, you will need to follow this article on how to extend the default entities and use the table-per-class way.
In Summary

This article showed you how to add custom targeting logic to Ucommerce, the user interface to configure it, and how to handle data access for it as well. When you think about it each target is a mini-application hosted inside Ucommerce dealing with all the usual concerns of a full-blown app.
Some of the concerns like the resolver need only be implemented once while others like the UI and the target itself are highly specific to the task they’re trying to accomplish and require a new implementation for each new type you need.
Marketing and particularly discounting are areas, which often come with very specific business rules highly different dependent on the individual business. Ucommerce ships with a bunch of useful targets, but having the ability to add your own ensures that you can accommodate any targeting scenario.