
Extending Trees in Ucommerce Admin
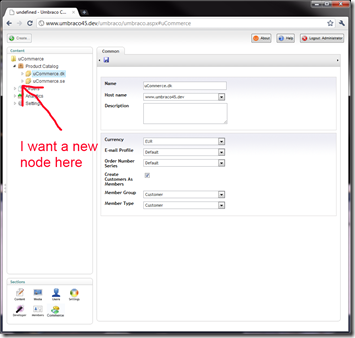
When working in the Ucommerce Admin tool it can be useful to be able to add your own custom nodes some in the trees, e.g. a new node under Product Catalog, Orders, Analytics, or Settings. This post describes how to achieve this.
The Ucommerce tree handlers are using the standard Umbraco extension point for creating new trees. You can learn more about that in the excellent Umbraco.tv episode Adding a Custom tree.
Finding the Extension Point
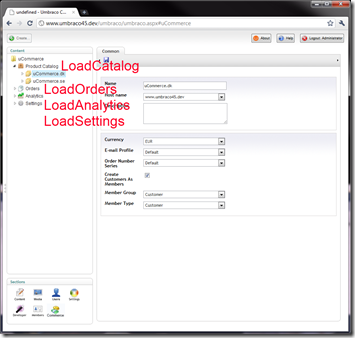
Ucommerce comes with a bunch of tree handlers for managing all aspects of the Ucommerce Foundations. Each tree handler deals with a separate root node in the Ucommerce tree so depending on which tree you want to insert your custom node in you’ll need a different tree handler.
The tree handlers are called Load
Handlers include:
    Product Catalog tree – UCommerce.Umbraco.Menu.LoadCatalog
    Orders tree– UCommerce.Umbraco.Menu.LoadOrders
    Analytics tree– UCommerce.Umbraco.Menu.LoadAnalytics
    Settingstree – UCommerce.Umbraco.Menu.LoadSettings
Overriding the Default Ucommerce Tree Handler
When you’ve found the handler you want to extend you need to derive from the Ucommerce class. In my case I’m extending the Product Catalog handler so I will derive from the LoadCatalog class.
To add your own node your need to override the method called Render(XmlTree tree) on the tree handler. This method is responsible for actually rendering the tree and will be triggered by Umbraco once configured to do so later on.
Please note that Umbraco isn’t exactly forthcoming with error messages which crop up during development of a tree handler so you’ll have to whip out the Sherlock Holmes thinking cap to find some of the issues which crop up. Especially Javascript for your Action will cause you grief.
    public class MyCustomTreeHandler : LoadCatalog
    {
        // Constructor is required by base type
        public MyCustomTreeHandler(string application) : base(application)
        {
        }

        public override void Render(ref umbraco.cms.presentation.Trees.XmlTree tree)
        {
            base.Render(ref tree);

            XmlTreeNode node = XmlTreeNode.Create(this);

            string nodeId = "MyCustomNode";
            // Unique id of the node, can be used to store information about a data object being displayed on a particular node
            node.NodeID = nodeId;

            // Text to display on the node itself
            node.Text = "My Custom Node";

            // Action trigged by mouse click
            node.Action = string.Format("javascript:{0}", "parent.right.document.location.href = '~/MyPage.htm';");

            node.Icon = "folder.png";
            node.OpenIcon = "folder.png";

            // The node type refers to a config file with Umbraco
            // which specifies additional config for a particular node
            // like dialogs and available right click actions
            // ~/umbraco/config/create/UI.xml
            node.NodeType = "my_custom_node_type";

            // Available right click actions as per UI.xml
            node.Menu = new List<IAction>(new IAction[] { ActionNew.Instance, ContextMenuSeperator.Instance, ActionDelete.Instance, ContextMenuSeperator.Instance, ActionRefresh.Instance });

            // Indicates whether the nodes is expandable
            node.HasChildren = false;

            // Source is used to perform async calls
            // Ucommerce provides an abstraction which works for both Umbraco 4 and 4.5
            // Notice that the nodeId is reused for this call
            node.Source = GetVersionSafeTreeServiceUrl(nodeId);

            tree.Add(node);
        }
    }
With the following code the node shows up in the tree. Interestingly the custom node turns up as a subnode to every single node in the catalog system, which isn’t what we’re after. We’d like to be able to insert a node anywhere in the tree, but just that one time.
Read on to find out what’s going in.
Determining Where You are in the Ucommerce Tree
Ucommerce trees are different from Umbraco trees in the sense that a single tree works with many different types of nodes. For example a catalog consists of product catalog groups (the store level), catalogs, and categories. To help you figure out where you are there are two properties you can ask: CurrentId and CatalogNodeType.
When Ucommerce builds its tree ids are consistently built up in the format catalogNodeTypeName_ObjectId. This helps Ucommerce determine which internal type we’re working with, e.g. a catalog group, a catalog, or a category, and which data object is currently in play.
To insert our node in a specific location we can ask CatalogNodeType what the type of the node currently being rendered is thus enabling us to only insert the custom node in a specific location in the tree.
For my example I’m inserting the node on the same level as the product catalog groups by inserting the following piece of code in the Render method of the tree handler:
    public override void Render(ref umbraco.cms.presentation.Trees.XmlTree tree)
    {
        base.Render(ref tree);

        if (CurrentNodeType != CatalogNodeType.Root) return;

        ...
    }
Enabling Child Nodes for a Custom Node
Should you need child nodes for your new node that’s absolutely possible as well. Some additional plumbing is needed to determine which nodes to load for a particular super node.
This is where the Node.Source property comes into play. You’ll have seen it configured on our custom node already like so node.Source = GetVersionSafeTreeServiceUrl(nodeId);.
Basically Umbraco loads child nodes on the fly by requesting a back end URL which is called TreeDataService.ashx. Among the parameters passed to this handler is the nodeKey which tells you the sub tree being requested.
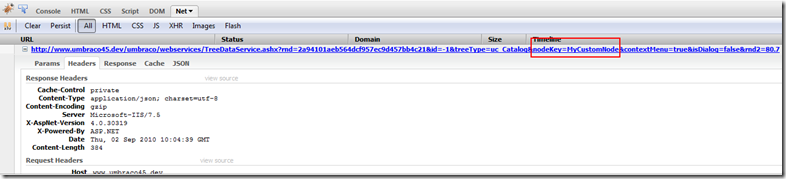
To make sure that we only generate child nodes for our MyCustomNode a check to determine which node is being requested is required as a single handler does all the work for the entire tree. For that to work we have to refactor our code a bit to support the sub nodes.
The Render method is still our main entry point from Umbraco so it has to act as an check point which will determine what needs to be rendered.
    public override void Render(ref umbraco.cms.presentation.Trees.XmlTree tree)
    {
        // Make sure to only render the default nodes at the root
        // and not under our custom node
        if (NodeKey != "MyCustomNode")
            base.Render(ref tree);

        XmlTreeNode node = null;

        // If the NodeKey passed by Umbraco is our custom id
        // we know that we need to render subnodes for our
        // custom node
        if (NodeKey == "MyCustomNode")
        {
            node = XmlTreeNode.Create(this);
            node.NodeID = "MyCustomSubnode";
            node.Text = "My Custom Subnode";
            node.Action = string.Format("javascript:{0}", "parent.right.document.location.href = '~/MySubPage.htm';");
            node.Icon = "folder.png";
            node.OpenIcon = "folder.png";
            node.NodeType = "my_custom_node_type";
            node.HasChildren = false;
        }
        // If we're at the root of the catalog
        // we render the custom node
        else if (CurrentNodeType == CatalogNodeType.Root)
        {
            node = RenderMyCustomNode();
        }
        else return;

        // Add the rendered content to the tree
        tree.Add(node);
    }
Final Code
Final code with support for a custom node under Product Catalog and child nodes for that looks like this:
    using System;
    using System.Collections.Generic;
    using UCommerce.Umbraco.Menu;
    using umbraco.cms.presentation.Trees;
    using umbraco.interfaces;
    using umbraco.BusinessLogic.Actions;

    namespace MyUCommerceApp.Umbraco
    {
        public class MyCustomTreeHandler : LoadCatalog
        {
            // Constructor is required by base type
            public MyCustomTreeHandler(string application)
                : base(application)
            {
            }

            public override void Render(ref umbraco.cms.presentation.Trees.XmlTree tree)
            {
                // Make sure to only render the default nodes at the root
                // and not under our custom node
                if (NodeKey != "MyCustomNode")
                    base.Render(ref tree);

                XmlTreeNode node = null;

                // If the NodeKey passed by Umbraco is our custom id
                // we know that we need to render subnodes for our
                // custom node
                if (NodeKey == "MyCustomNode")
                {
                    node = XmlTreeNode.Create(this);
                    node.NodeID = "MyCustomSubnode";
                    node.Text = "My Custom Subnode";
                    node.Action = string.Format("javascript:{0}", "parent.right.document.location.href = '~/MySubPage.htm';");
                    node.Icon = "folder.png";
                    node.OpenIcon = "folder.png";
                    node.NodeType = "my_custom_node_type";
                    node.HasChildren = false;
                }
                // If we're at the root of the catalog
                // we render the custom node
                else if (CurrentNodeType == CatalogNodeType.Root)
                {
                    node = RenderMyCustomNode();
                }

                else return;

                tree.Add(node);
            }

            public XmlTreeNode RenderMyCustomNode()
            {
                XmlTreeNode node = XmlTreeNode.Create(this);

                string nodeId = "MyCustomNode";

                // Unique id of the node, can be used to store information about a data object being displayed on a particular node
                node.NodeID = nodeId;

                // Text to display on the node itself
                node.Text = "My Custom Node";

                // Action trigged by mouse click
                node.Action = string.Format("javascript:{0}", "parent.right.document.location.href = '~/MyPage.htm';");

                // Images are picked up from ~/umbraco/images/umbraco
                node.Icon = "folder.png";
                node.OpenIcon = "folder.png";

                // The node type refers to a config file with Umbraco
                // which specifies additional config for a particular node
                // like dialogs and available right click actions
                // ~/umbraco/config/create/UI.xml
                node.NodeType = "my_custom_node_type";

                // Available right click actions as per UI.xml
                node.Menu = new List<IAction>(new IAction[] { ActionNew.Instance, ContextMenuSeperator.Instance, ActionDelete.Instance, ContextMenuSeperator.Instance, ActionRefresh.Instance });

                // Indicates whether the nodes is expandable
                node.HasChildren = true;

                // Source is used to perform async calls to load children of the node
                // Ucommerce provides an abstraction which works for both Umbraco 4 and 4.5
                // Notice that the nodeId is reused for this call
                node.Source = GetVersionSafeTreeServiceUrl(nodeId);
                return node;
            }
        }
    }
Configuring Your Custom Tree Handler with Umbraco
To replace the Ucommerce tree handler with your own you need to open up the Umbraco database and look for the table called umbracoAppTree.
This table specifies the piece of code which builds a given tree and which app it’s associated with. The default Ucommerce config will some like this:

The fields in question are called treeHandlerAssembly and treeHandlerType, which contains the name of the DLL which contains your new class and the name of the class which will handle the tree.
With the custom tree handler in place the configuration will now look like this:

In Summary
You can hook into almost any aspect of the Ucommerce Admin to replace or extended the existing UIs thanks to the flexibility of Umbraco and the custom extensions built on top.
Working with the Ucommerce trees is much the same process as the default Umbraco approach although you will have to deal with different types of nodes in a single tree.
With this extension in place you’re free to load your own webform and do whatever you want with it.