
Enable the Ucommerce E-commerce API Outside the Web Context
In some cases though you might need to leverage the API outside a web context for automated integration between systems, for custom web services, or integration of Ucommerce functionality directly in other custom applications such as point of sale- or kiosk apps.
This article outlines the steps required to make that happen.
Create New Console Application Project
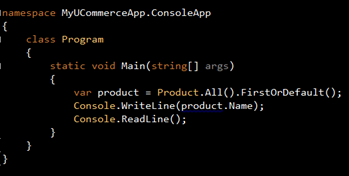
Open Visual Studio and create a new console application project in the usual way. We’ll use that as a basis for getting the APIs up and running.
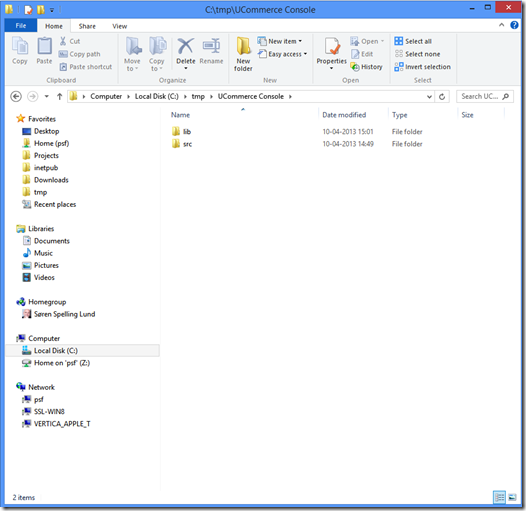
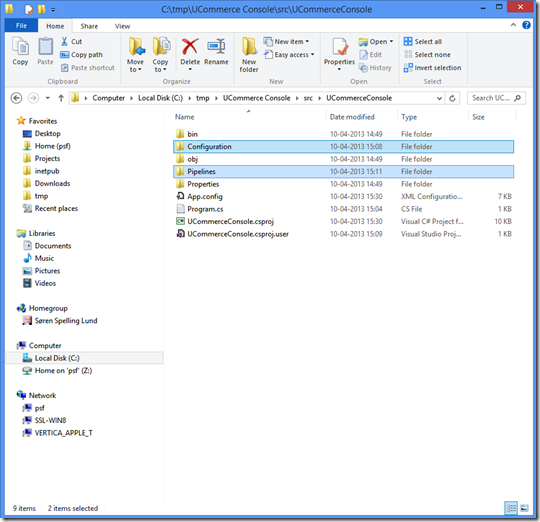
My usual project structure has a folder for the project source and any libraries required to build it like below.
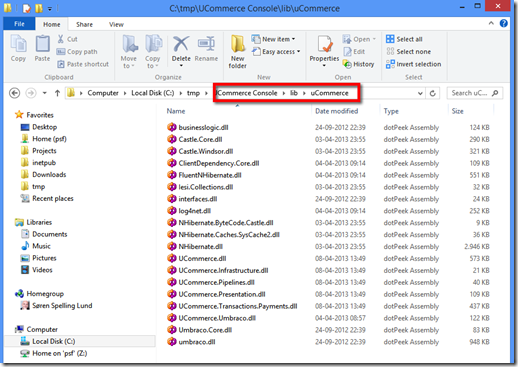
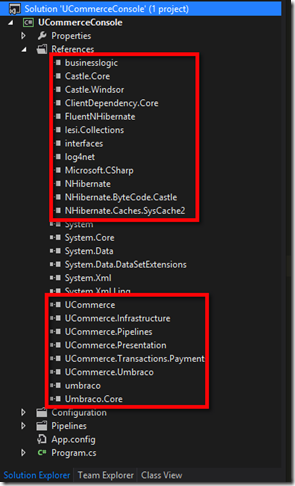
Copy Ucommerce Assemblies to Project
You’ll find the assemblies in your website under /bin.
Copy the following assemblies to /lib in your project.
Castle.Core
Castle.Windsor
FluentNHibernate
Iesi.Collections
log4net
NHibernate.ByteCode.Castle
NHibernate.Caches.SysCache2
UCommerce
UCommerce.Infrastructure
UCommerce.Pipelines
UCommerce.Transactions.Payments
UCommerce.Presentation
UCommerce.Umbraco
interface
umbraco
businesslogic
ClientDependency.Core
Umbraco.Core
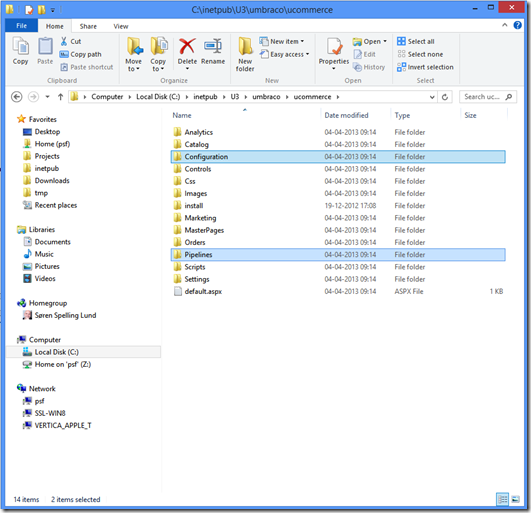
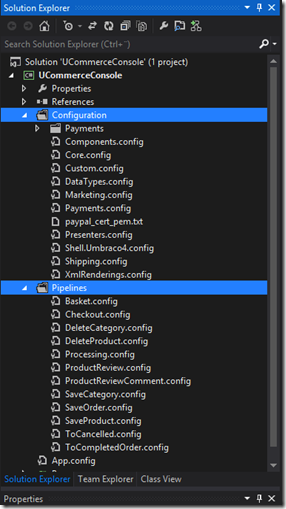
Copy the Configuration and Pipelines Folders to the Project
You’ll want the core configuration and the pipelines as part of your project to be able to use the API fully.
Copy these folders to the project folder of your solution.
To project:
Include Configuration and Pipelines in Project
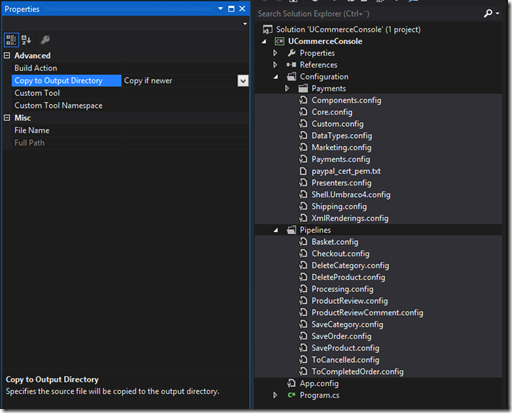
Set Configuration and Pipelines Folders to Copy to Output Folder
For Ucommerce to able to pick up the configuration they need to be copied to the output folder of the compiled application.
Select all the config files and press F4 to bring up the properties for the files.
Set “Copy to Output Directory” to “Copy if newer”.
Reference the Assemblies in Your Project
Next reference the assemblies you copied to the /lib folder in Visual Studio.
Modify App.Config
Next up we need to modify the application config with settings to enable the final bits of Ucommerce to run.
Open up web.config of your Umbraco site and locate the configSections element. Copy the sectionGroups called “commerce” and “systemcache” to the coonfigSections element of App.config.
    <sectionGroup name="commerce"
    	type="System.Configuration.ConfigurationSectionGroup">
    <section name="syscache"
    	type="NHibernate.Caches.SysCache.SysCacheSectionHandler,
    	NHibernate.Caches.SysCache2" requirePermission="false" />
Finally we need the actual sections from web.config copied to app.config.
<commerce>
<syscache>
With all that in place your App.config file should look like this:
    <?xml version="1.0" encoding="utf-8" ?>
    <configuration>
    	<configSections>
    		<sectionGroup name="commerce" type="System.Configuration.ConfigurationSectionGroup">
    			<section name="catalogConfiguration" type="UCommerce.Infrastructure.Configuration.CatalogConfigurationSection, UCommerce.Infrastructure" />
    			<section name="runtimeConfiguration" type="UCommerce.Infrastructure.Configuration.RuntimeConfigurationSection, UCommerce.Infrastructure" />
    			<section name="securityConfiguration" type="UCommerce.Infrastructure.Configuration.SecurityConfigurationSection, UCommerce.Infrastructure" />
    			<section name="amazonPaymentMethodService" type="UCommerce.Transactions.Payments.Amazon.Configuration.AmazonPaymentMethodServiceConfigurationSection, UCommerce.Transactions.Payments" requirePermission="false" />
    			...
    		</sectionGroup>
    		<section name="syscache" type="NHibernate.Caches.SysCache.SysCacheSectionHandler, NHibernate.Caches.SysCache2" requirePermission="false" />
    	</configSections>
    	<commerce>
    		<runtimeConfiguration enableCache="false" cacheProvider="NHibernate.Caches.SysCache2.SysCacheProvider, NHibernate.Caches.SysCache2" connectionString="(auto)" />
    		<catalogConfiguration defaultCultureCode="en-US" enforceCategoryNameUniquenessWithinCatalogs="true" />
    		<securityConfiguration enable="true" />
    		<amazonPaymentMethodService configSource="umbraco\ucommerce\configuration\payments\Amazon.config" />
    		...
    	</commerce>
    	<syscache>
    		<!-- Cache catalog objects for 60 mins before refreshing -->
    		<cache region="CatalogFoundation" expiration="3600" priority="5" />
    		<cache region="MarketingFoundation" expiration="3600" priority="5" />
    		<cache region="SecurityFoundation" expiration="3600" priority="5" />
    	</syscache>
    </configuration>
Modify Connection String
Finally you need to point the connection string at your database. Simply replace the (auto) values with an actual connection string and you’re good to go.
<runtimeConfiguration ... connectionString="server=(local);database=Umbraco;user id=umbraco;password=1234567890" />
Summary
Leveraging Ucommerce outside a web site makes for some interesting use cases. Foremost is automated integration with other systems, but you could use this method to establish an offline Point of Sale or Kiosk-type system with a completely different frontend done in Windows Presentation Foundation for a rich in store experience.