
Setup Ucommerce to Include RBS WorldPay as a Payment Method
Ucommerce comes with built-in support for RBS WorldPay payments. This guide will walk you through getting Ucommerce to work with RBS WordPay for payment processing.
Authorization is available for all plans with RBS WorldPay. If you wish to acquire (capture) or refund payments you need to mail: [email protected] and ask them to setup “Remote Admin”. At the moment it’s not possible to cancel an authorization with the “Remote Admin”.
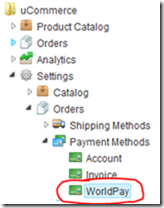
Settings in Ucommerce
Add a new payment method, under “Ucommerce –> Settings –> Orders –> Payment Methods”. You can call it whatever you like, here I have used “WorldPay”.
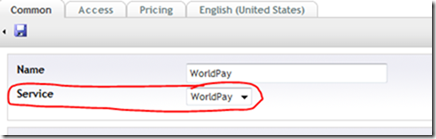
Click the newly created node and select “Worldpay” in the Service drop down list. Fill out the rest of the required information, like where it’s available from under the “Access” tab, pricing and the language tabs. When done click “Save”.
That’s everything in the Ucommerce interface.
Settings in WorldPay Administration Panel
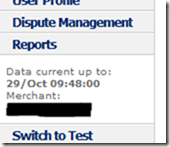
Changes needed in the WorldPay administration panel, so it will work with Ucommerce. Make sure when you are logged in that you are in “Production” mode or else you want to able to save the changes. If you can see the “Switch to Test” link on the picture below, you are in “Production” mode.
Edit Payment Pages
This out of scope for this guide, however World Pay offers lots of possibilities for customizing the results pages. You can read more about it here.
Instant capture
In Denmark it is not allowed to capture a payment before the order is shipped, so we need to turn this off. This can different in other countries.
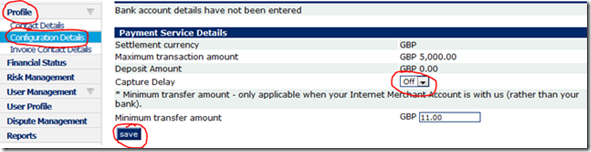
Settings
· “Off” means you need to manually capture the payment.
· “0” Means instant capture.
· “1-14” are delay in days before the capture happens.
Changing the setting
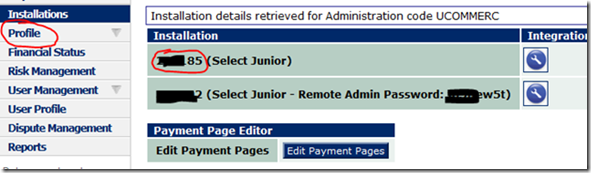
· Click “Profile” in the menu to the left.
· Click “Configuration Details”
· Capture Delay: Set the value as accordingly.
· Click “Save”
General changes to the account
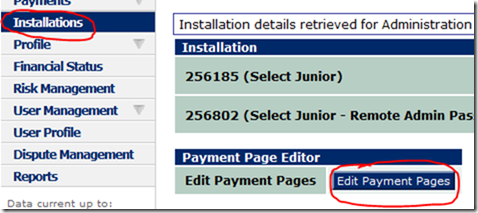
- In the menu to the left click “Installations” and you should get a list like the one below.
- Then click the “Edit” button that are on the same line as the text: “Select Junior”, this is the primary account.

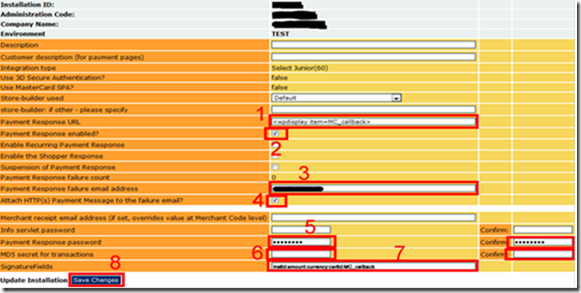
Settings
-
Payment Response URL.
- Put the following text there without the quotes:
“<wpdisplay item=MC_callback>”
-
Payment Response enabled?
- Make sure it’s checked.
-
Payment Response failure email address.
- Write your email address here, if you want to receive email notifications, when an error occurs with the “Payment Response”
- Check the option “Attach HTTP(s) Payment Message to the failure email?” if you want detailed information attached to the email.
-
Payment Response password.
- A password of your choice. In the next section this is referred to as the “callbackPW”, please take a note of this.
-
MD5 secret for transations.
- Custom text of your choice. But less than 32 characters. This is referred to as the “Signature” in the next section, so please take a note of it.
-
SignatureFields
- Type the following text below without the quotes, or you will get an “Invalid MD5” signature when trying to make a authentication.
- “instId:amount:currency:cartId:MC_callback”
- Click “Save” and you are done in this section.
Editing the Worldpay.config File
Now we need to edit the WorldPay.config file.
You will find the WorldPay.config file in the following location, where “rootdir” is the directory on the computer where you installed Umbraco: “rootdir\umbraco\UCommerce\Configuration\WorldPay.config”. Usually “rootdir” is c:\inetpub.
Some of the below information are found in the WorldPay administration panel, so start by logging in you aren’t already.
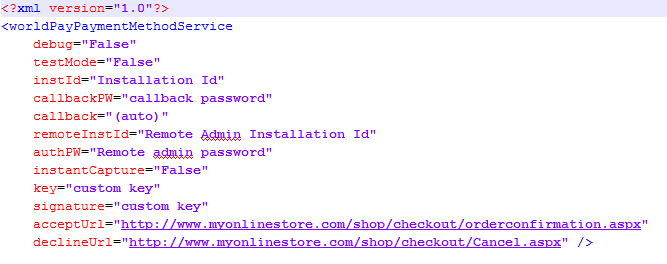
Finding debug
If set it to “True” you will be prompted to click a button before posting the information to “WorldPay” otherwise it will do an autosubmit using Javascript. When running in production, you will want this set to “False”.
Finding testMode
Set this value to “True” when testing the integration with WorldPay. When going live set this value to “False”.
Finding instId
Click “Profile” in the menu. The “instId” is the number (normally 6 digits) in the red cirkel.
Finding callbackPW
This is the “callbackPW” from the previous section.
Finding callback
Leave this at “(auto)” if in doubt.
Optional: Finding remoteInstId and authPW
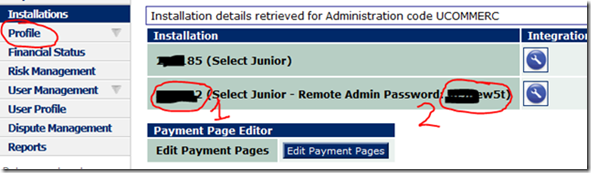
Click the “Profile” link in the menu to the left. Then you will see a screen like the one below.
This is the remoteInstId and is normally 6 digits. This is the authPW, random digits and letters
Finding instantCapture
True/False whether instant capture is On or Off. If you choose “Off” in the instantCapture in the previously section, this values needs to be “False” otherwise “True”.
Finding key
This is just a text string of your choice. Recommended is just using random digits/letters.
acceptUrl The url you want your customer to return to in case they fullfill the order.
declineUrl The url you want your customer to return to in case they reject the order.
Executing a Pipeline on Callback
Running a pipeline once payment is authorized can be helpful if you need to complete the order once the customer returns to your site.
To run a “pipeline” once the callback if received and processed, you need to modify the database. If you used the name “WorldPay” for the payment method name, you can run this SQL query in the SQL Server Management Studio.
UPDATE Ucommerce_PaymentMethod SET Pipeline = 'Checkout' WHERE Name = 'WorldPay'
or just edit it manually in SQL Server Management Studio.

Now the default pipeline that comes with Ucommerce will be run after each successful callback. This sets the Basket to an Order, gives it an OrderNumber, and other things.
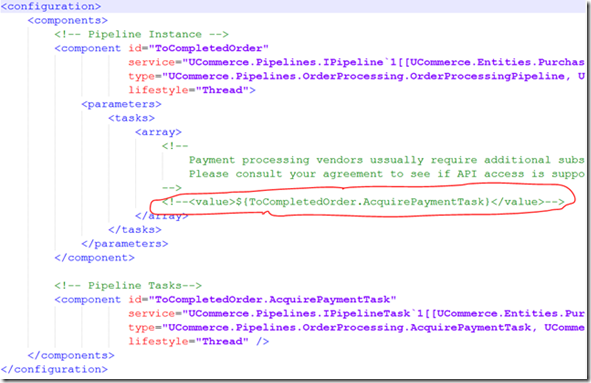
Optional: Enable Acquire, Cancel, and Refund in Ucommerce Back Office
To be able to acquire, cancel, and refund payments you need to enable two pipeline tasks in the ToCompletedOrder pipeline and ToCancelled pipeline.
The pipeline configuration is found in /umbraco/ucommerce/pipelines.
ToCancelled.config

ToCompletedOrder.config
FAQ
- Testmode – Make sure test mode if turned off when going live.
- I get the error message “Cannot find an available route for the purchase. This may be caused by merchant configuration or remote systems failures.” The error messages might mean a number of different things. One of the meaning that we encountered during test is that our transaction amounts were greater than GBP 5,000.
- Acquiring a payment and immediately cancelling the same payment moves the order to “Requires Attention” RBS WorldPay employs a queuing system for handling payments which means that when Ucommerce asks WorldPay to acquire a payment we immediately get back a response which indicates that all went well, but in actuality the transaction is queue for acquire on their end. If a transaction is cancelled immediately after the state on the Ucommerce end is different from RBS WorldPay thus an error message is logged in the following form: “Refund failed >> N,-1,PMPPI.invalidStatus”.