Setup Ucommerce to Include MultiSafepay as a Payment Method
Ucommerce comes with buil-in support for MultiSafepay. This guide will walk you through getting Ucommerce working with MultiSafepay for payment processing.
Settings in Ucommerce
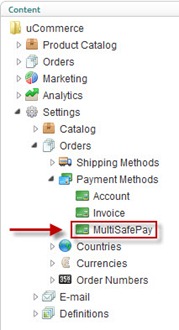
Add a new payment method, under “Ucommerce -> Settings -> Orders -> Payment Methods”. You can call it whatever you like, here I have used “MultiSafepay”.
Click the newly created node and select “MultiSafepay” in the Service drop down list. Choose Checkout ast he pipeline. Fill out the rest of the required information, like where it’s available from under the “Access” tab, pricing and the language tabs. When you are done click “Save”.
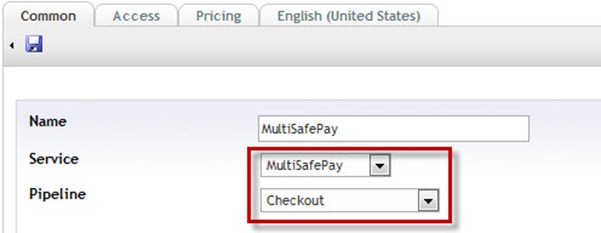
That’s everything in the Ucommerce interface.
Settings in MultiSafepay back office.
Create a back office at MultiSafepay with the MultiSafepay Connect.
Create a new website under Setttings -> Sites.
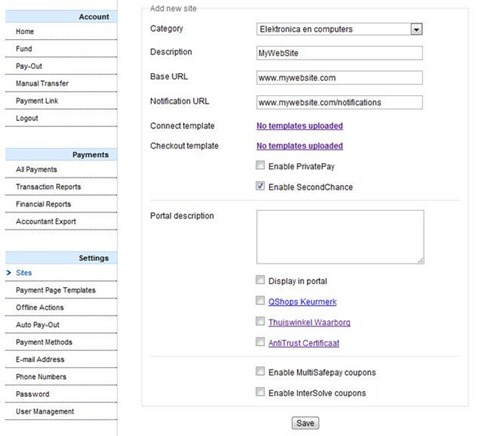
Category
Choose the category your site belongs to
Description
Can be anything, just a name you give your website.
Base URL
The URL for your website
Notification URL
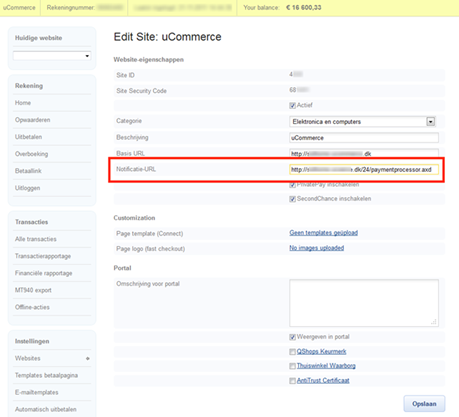
MultiSafepay notifies Ucommerce about new payments and changes to existing payments using the notification URL. The URL you receive notifications from MultiSafepay will be in the format https://www.mystore.com/id of your payment method/PaymentProcessor.axd
To find the PaymentMethodId you need to search the database. If you used the name “MultiSafepay” for the payment method name, you can run this SQL query in the SQL Server Management Studio:
select PaymentMethodId from Ucommerce_PaymentMethod where Name='MultiSafepay'
A sample URL for a payment method with an ID of 10 would be https://www.mystore.com/10/PaymentProcessor.axd
PrivatePay
An option so MultiSafepay won’t give you information regarding the consumer. Name and address will be excluded.
SecondChance
Should the consumer cancel midway, they will receive an email giving them a second chance to complete the process.
Editing the MultiSafepay.config file
Now we need to edit the MultiSafepay.config file.
You will find the MultiSafepay.config file in the following location, where “rootdir” is the directory on the computer where you installed Umbraco: “rootdir\umbraco\UCommerce\Configuration\ MultiSafepay.config”. Usually “rootdir” is c:\inetpub.

TestMode
If set to “True” the MultiSafepay test site will be used, not their live site. If not testing, this should be set to “False”.
Account Id
Your account ID from the MultiSafepay back office. (See picture below)
SiteId
The ID provided by MultiSafepay when creating a new site. (See picture below)
SiteSecurityCode
The SiteSecureCode provided by MultiSafepay when creating a new site. (See picture below)
CallbackUrl
Leave setting at (auto) unless you want to handle callbacks yourself.
Accept
The URL you return to when completing a payment.
CancelUrl
The URL you return to when cancelling a payment.
Click Settings è Websites to find the screen below.
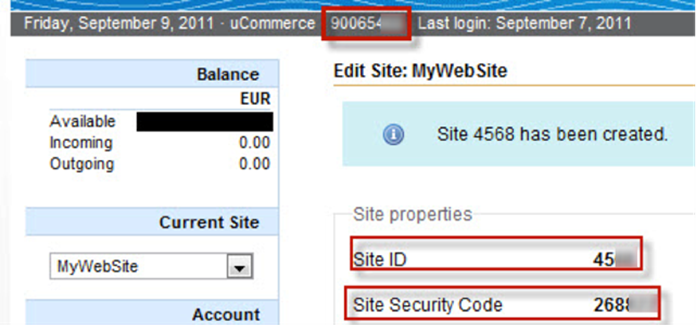
MultiSafepay back office
In the MultiSafepay back office you have options to refund and cancel, this cannot be done without using the MultiSafepay back office.

Use the green refund button to start a refund or the red cross to cancel a pending payment.
Please note that any changes to a payment in the back office will cause a notification to be sent to Ucommerce. The notification will cause Ucommerce to update the status of the order the payment belongs to to “Requires Attention”.
