
Setup Ucommerce to Include ePay as a Payment Method
Ucommerce comes with built-in support for ePay payments. This guide will walk you through getting Ucommerce to work with ePay for payment processing.
Authorization is available for all plans with ePay, i.e. Light, Pro, and Business.
Capabilities
If you wish to acquire (capture), refund, or cancel payments ePay requires you to buy the Business plan. You can see how to enable this here.
Settings in Ucommerce
If you haven't completed the steps from the General Setup of Payment Methods in Ucommerce document you need to do that before you move on.
When the payment method is created and saved as described in here. The back-end displays the different settings you can set for ePay.
Settings in ePay Administration Panel
Changes needed in the ePay administration panel, so it will work with Ucommerce. You can find the administration panel at https://ssl.ditonlinebetalingssystem.dk/admin/login.asp.
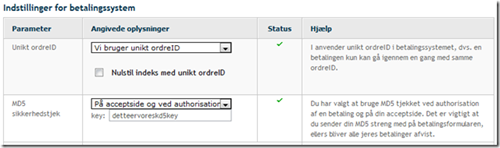
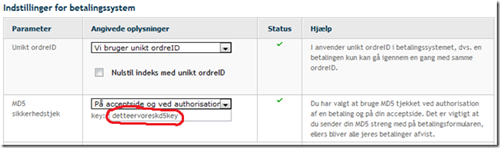
Unikt orderID, MD5 sikkerhedstjek
On the Menu on the left, click “Indstillinger–> Betalingssystemet”, then you should get a view like the one below. These are the settings we recommend. Make a random key out of some digits/characters.
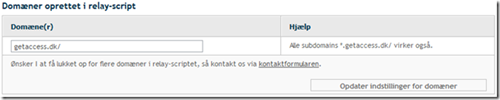
On the same page you need to enter the domain that the callbacks is made to. This include all subdomains.
Optional: Webservice setting if you need to Acquire, Cancel, and Refund
-
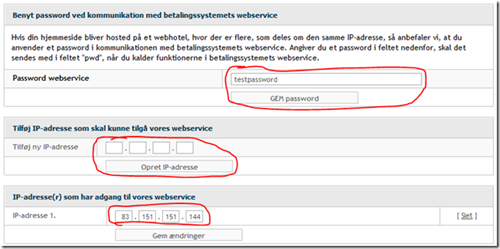
Now on the menu to the left, go to “API / Webservices –> Adgang”
-
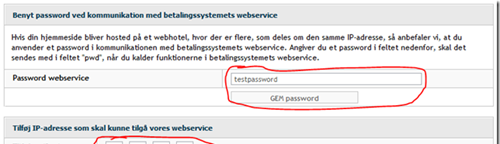
Set a password if you are using a shared hosting environment
-
At the bottom type in the “IP address” of the webhost accessing the webservice. This needs to be the external ip address
-
Click “Opret IP-adresse” to save it
Configuring the ePay payment method
Now we need to edit the payment method.
Some of the below information are found in the ePay administration panel, so start by logging in if you aren’t already.
Finding callback
Unless you have implemented your own version of the callback handling, this should be set to “(auto)”.
Finding acceptUrl
Url the user is returned to after successfully authorizing her credit card.
Finding declineUrl
Url the user is returned to if she cancels a purchase.
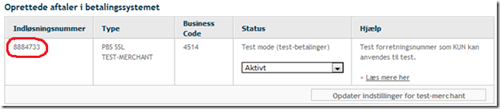
Finding merchantNumber
The “Indløsningsnummer” is unique for your account. This can be found in the menu “Indstillinger -> Betalingssystemet”. Also make sure that “Test mode” is not active, like it is on the picture below, if you’re setting up a production environment.
Optional: Finding pwd if you need to Acquire, Cancel, or Refund
Password used for the webservice, if using a shared host. This can be found in the menu “API / Webservices -> Adgang”.
Finding useMd5
True/False indicating whether to use Md5. Its recommended to use Md5 for security reasons.
Finding SplitPayment
True/False indicating whether to use SplitPayment.
Finding key
The Md5 key set in the administration panel.
This can be found in the menu “Indstillinger–> Betalingssystemet”.
Executing a Pipeline on Callback
Running a pipeline once a payment is authorized can be helpful if you need to complete the order once the customer returns to your site.
To run a “pipeline” once the callback if received and processed, you need to modify the database. If you used the name “ePay” for the payment method name, you can run this SQL query in the SQL Server Management Studio.
UPDATE Ucommerce_PaymentMethod SET Pipeline = 'Checkout' WHERE Name = 'ePay'
or just edit it manually in SQL Server Management Studio.

Now the default piplline that comes with Ucommerce will be run after each successful callback. This sets the Basket to an Order, gives it an OrderNumber, and other things.