
Setup Ucommerce to Include Adyen as a Payment Method
Ucommerce comes with built-in support for Adyen payments. This guide will walk you through getting Ucommerce to work with Adyen for payment processing.
Capabilities
Adyen is one of the payment providers which support the Acquire, Cancel, and Refund functionality. You can see how to enable this General Setup of Payment Methods in Ucommerce.
Settings in Ucommerce
If you haven't completed the steps from the General Setup of Payment Methods in Ucommerce document you need to do that before you move on.
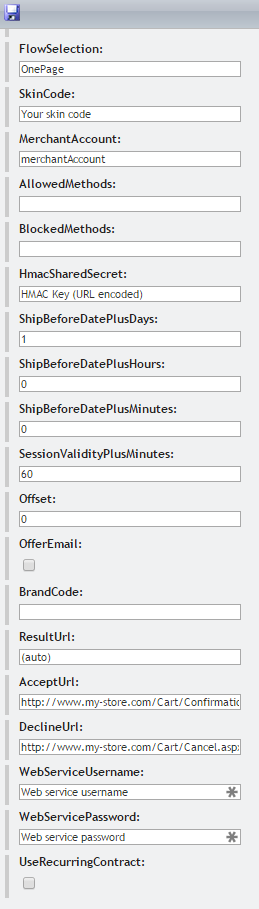
When the payment method is created and saved as described in General Setup of Payment Methods in Ucommerce. The back-end displays the different settings you can set for Adyen.
Notice: This allows you to setup multiple payment methods all using Adyen, but with different configurations.
Most of the information needed for the configuring, is found in the Adyen Customer Area.
Live: Whether your site is running in test mode or live mode.
PaymentFlowSelection: Either OnePage, MultiplePage or DirectoryLookup. OnePage is the default behavior.
SkinCode: The skin code for the skin you created in the Adyen Customer Area.
MerchantAccount: The account name of your merchant account.
HMACSharedSecret: The HMAC key you chose in the Adyen Customer Area. URL encoded!
ResultURL: This should almost always be set to (auto), unless you defined a custom result URL in Adyen Customer Area, in which case it should be left blank.
AcceptURL: The URL for the user to be redirected to, once the payment is completed.
CancelURL: The URL for the user to be redirected to, if the payment fails.
WebserviceUsername: The webservice username.
WebservicePassword: The webservice password. URL encoded!
UseRecurringContract: Set this to “True” if you are planning on making recurring payments with Adyen.
That’s all you have to set up from the Ucommerce back-end.
Settings in the Adyen Customer Area
Notifications
Adyen sends back notifications after every payment, to ensure that our system knows about the payments made. Go to “Settings -> Notifications” on https://ca-live.adyen.com/ca/ca/login.shtml. The notification URL should have the format: “http://{store base url}/{payment method id}/PaymentProcessor.axd. * Replace {store base url} with the base url of your store, fx. www.my-store.com. * Replace {payment method id} with the id of the Adyen payment method created in Ucommerce. You can find the correct id in the Ucommerce database. * Look for the PaymentMethodId column, in the “Ucommerce_PaymentMethod” table.
Active should be enabled.
Method should be set to “HTTP POST”.
Populate SOAPAction header should be disabled.

Click the “Save Settings” button.
An Important Note on Security for Notifications!
It is important to protect the notification URL, since Adyen does not provide any message authentication. It is possible to setup basic authentication in Adyen, providing a user name and password. The recommended action is to protect the URL using SSL.
Merchant Settings
Go to “Settings -> Merchant Settings”. Capturing payments should be done manually from the Ucommerce back-end. Make sure the “Capture Delay” field is set to “manual”.

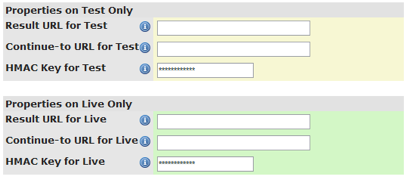
Create a Skin
Adyen requires you to create a custom skin for the payment page.
Go to “Skins -> New”.
Choose a secret HMAC key, for both live and test. The key is used by Ucommerce to make sure the payments aren’t being altered in any way.
You generally would not need to set the Result URL, as that URL is created automatically by Ucommerce. We highly recommend not using a custom result URL.
Input the rest of the options you need, and create the new skin.
Using Recurring Payments with Adyen
You might need to contact Adyen support in order to enable the recurring payment functionality, as it might not be enabled per default.
To use recurring payments with Adyen, you will first have to enable it in the Adyen.config file.
Setting Up the Recurring Payment
When recurring payments are enabled, you can start a new recurring payment, by making a normal payment in the same way as you would usually do.
This will make a payment of 1 euro, and when it has been authenticated, it will be cancelled immediately. This sets up all the necessary recurring contract data at Adyen.
When you need to acquire the first payment, you need to call code like the example below.
Subsequent Payments
All the subsequent payments will have to be acquired manually, through the PaymentMethodService. Here is an example of acquiring a new payment on an existing recurring payment:
    @{
        var request = HttpContext.Current.Request;
        if (request.HttpMethod == "POST" && request.Form.AllKeys.Any(x => x == "acquire-payment"))
        {
            var originalPayment = Payment.All()
                .SingleOrDefault(x => x.ReferenceId == request.Form["originalPaymentReferenceId"]);

            if (originalPayment != null) {
                var pms = (AdyenPaymentMethodService)originalPayment.PaymentMethod.GetPaymentMethodService();

                var amount = new Money(
                    decimal.Parse(request.Form["amount"]),
                    originalPayment.PurchaseOrder.BillingCurrency);

                var paymentRequest = new PaymentRequest(
                    originalPayment.PurchaseOrder,
                    originalPayment.PaymentMethod,
                    amount);

                var payment = pms.CreatePayment(paymentRequest);

                pms.AcquirePayment(payment);
            }
        }
    }
Authorization requests that are PENDING
In some situations, Adyen will return "PENDING" for an authorization request. This means that the accept or decline of the attempt can only be determined at a later stage. In there cases, the user is still directed to the accept URL, but the order is put in status "Processing". And the payment remains in status "PendintAuthorization".