
Create A New Admin Page with Tabs In The Backend (deprecated)
Before you read on, please know that extensibility in our webforms framework is deprecated and will be removed soon. Please read here for a little more context.
When you need to create a complete new admin page that allows to edit custom data you can re-use the existing framework that Ucommerce provides, in order to get everything wired up. This article will explain how to achieve this, if you just want to know how to create a new tab for an existing editor, Please refer to Create new tabs for existing editors
The Editors Of Ucommerce
Redundant of your choice of CMS, the editors of Ucommerce are just different pages loaded up into an iframe in the back office. The editors could in theory be a static HTML page, a page on a complete different domain or a asp.net web form. This simply means if you have extended the tree to show custom nodes and you want to display a related editor, you can just point the iframe to a page within your installation. This page does not necessarily need to observe any kind of convention or interface. So if you want something quick and dirty this can be achieved quite fast. But if you want to create a seamless integration with Ucommerce you need to hook in to the framework that renders the different editors and associated tabs. The rest of this article will feature the steps needed to achieve this.
The page structure
Each page is going to derive from a master page "UCommerceAdmin.Master" This master page will have the responsibility to render the content of the page. The OnInit method looks like this:
    using Ucommerce.Web.UI.Ucommerce.MasterPages;
    using System;
    using Ucommerce.Presentation.Web.Pages;

    public class AddNewPage : UcommerceAdmin
    {
        protected override void OnInit(EventArgs e)
        {
            base.OnInit(e);

            if (Page is ITabView)
            {
                var tabView = ((ITabView)Page).InitializeTabView();
                TabViewPlaceHolder.Controls.Add(tabView);
            }
        }

    }
This is also the reason why we must implement ITaView on our page. More on that later when we're going to deal with this. Our page will actually just be an empty page that implements the right interfaces in order to render the page accordingly. This is also important when we're going to create the different user controls that are rendered as the tabs. Our page will enable us to access all the relevant data in the different tabs, like the entity we're editing and the events being fired when the user clicks save or delete.
The generated control that are being added to the controls collection of the master page, is the final editor that we want to build with the tabs that we want to have. In this example we're going to build a product editor that eventually will look like this:
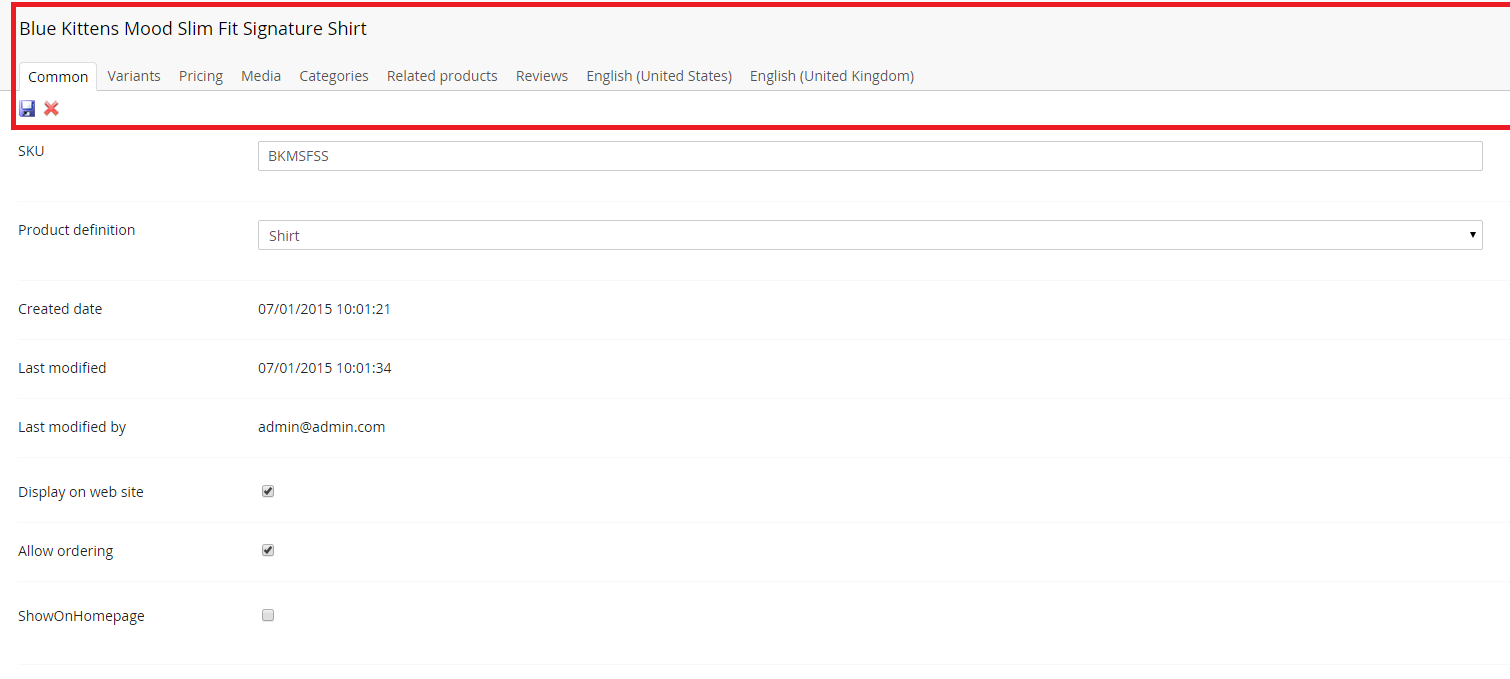
The framed content in the red box is what we want to have generated by hooking into the framework. The rest of the content is up to the user to create. All this content will be placed in different tabs, that has an according user control. How to implement that will be featured in the following article: Create new tabs for existing editors
The MVP Pattern
Ucommerce uses a Model View Presenter pattern to wire everything up. The basic aspects of this is:
-
Model
- The business object you want to create editors for e.g. PurchaseOrder, Product
-
View
- The contract for your editor. This object holds the available data needed like the business object itself, events that can be triggered, related data and similar.
-
Presenter
- The component responsible for loading data, wire up events, execute events
More specific in Ucommerce these are the corresponding terms we need to work with:
-
IView, ISaveableView, IDeleteableView
- The view associated with the data related to your editors.
-
IPresenter
- The presenter that are responsible for loading data into the view.
Implementing a New Editor
In this example we'll walk over how to implement a product editor that enables us to manage products in Ucommerce.
Defining The View
In the early stage of our implementation we need to figure out whether the user can save and delete objects displayed in the editor and what data we need. This can of course always be extended, but we want to hold the data available to as few things as possible to avoid loading up too much data. In our case we need to be able to save and delete products, so our view in the first place looks like this:
    public interface IEditProductView : Ucommerce.Presentation.Views.ISaveableView<Ucommerce.EntitiesV2.Product>, Ucommerce.Presentation.Views.IDeletableView<Ucommerce.EntitiesV2.Product>
    {
    }
Note: If we just need to display information, it would be sufficient to just derrive from IView
The view itself besides a few methods contains two events we can wire up: Load and Unload and when we choose to implement ISaveableView and IDeletableView we also have: Save Saving Saved Delete Deleting Deleted. We'll save this for later.
Now we need to define the rest of the interface - basically what we need to have available in all our controls. We obviously need to have the product - and since they should be loaded with an id that comes from a querystring - a product identifier as well. We also need to be able to switch the definition on our products, so a list of available product definitions as well, since we need to load some control that shows the available definitions. Now that we've figured that out our interface now looks like this:
    public interface IEditProductView : Ucommerce.Presentation.Views.ISaveableView<Ucommerce.EntitiesV2.Product>, Ucommerce.Presentation.Views.IDeletableView<Ucommerce.EntitiesV2.Product>
    {
        int ProductId { get; }

        Ucommerce.EntitiesV2.Product Product { get; set; }

        IList<Ucommerce.EntitiesV2.ProductDefinition> ProductDefinitions { get; set; }
    }
The idea is to place all the relevant information as formalized properties on the interface - so if there's a piece of information your missing, put it on the interface to be loaded in the presenter.
Implementing The Presenter
The presenter is as described earlier in the article, responsible for loading data into the view. The IPresenter interface has a few methods we need to deal with, We'll start of by creating a new class 'EditProductPresenter' and derrive from an abstract class 'Presenter
    public class EditProductPresenter : Ucommerce.Presentation.Presenters.Presenter<IEditProductView>
    {
        public EditProductPresenter()
        {

        }

        public override void HydrateView()
        {
            throw new NotImplementedException();
        }

        public override void WireEvents()
        {
            throw new NotImplementedException();
        }

        public override void UnwireEvents()
        {
            throw new NotImplementedException();
        }
    }
There's three methods we need to take care of, which is:
-
HydrateView
- Load all the data into the view
-
WireEvents
- All events should be wired up here
-
UnwireEvents
- All events should be taken down here
Let's start with the easy part and wire up our events. We only need to wire up the events we actually need, so if you find yourself having empty handling events, just remove them again.:
    public override void HydrateView()
    {
        throw new NotImplementedException();
    }

    public override void WireEvents()
    {
        View.Unload += View_Unload;
        View.Save += View_Save;
        View.Saved += View_Saved;
        View.Delete += View_Delete;
    }

    private void View_Save(object sender, EventArgs e)
    {
    }

    private void View_Unload(object sender, EventArgs e)
    {
    }

    private void View_Delete(object sender, EventArgs e)
    {
    }

    private void View_Saved(object sender, EventArgs e)
    {
    }

    public override void UnwireEvents()
    {
        View.Unload -= View_Unload;
        View.Save -= View_Save;
        View.Saved -= View_Saved;
        View.Delete -= View_Delete;
    }
When it comes to HydrateView, this is the method where we load up all data like the available ProductDefinitions, the product itself and what else we need. It is intended that the presenter is configured in the dependency injection container, so all dependencies such as repositories to load data from the database can just be injected into the constructor. In this case we need two repositories.: One for loading products and one for loading product definitions. We also have dependencies for other purposes, just inject what you need - but make sure all dependencies are registered in the container:
You need to register the presenter and the dependencies you might have. Please refer to How to register a component in Ucommerce if you're interested in more details about components.
    private readonly ISecurityService _securityService;
    private IRepository<ProductDefinition> _productDefinitionRepository;
    private IRepository<Product> _productRepository;
    private IPipeline<Product> _deleteProductPipeline;

    private IPipeline<Product> _saveProductPipeline;

    public EditProductPresenter(
        ISecurityService securityService,
        IRepository<ProductDefinition> productDefinitionRepository,
        IRepository<Product> productRepository,
        IPipeline<Product> saveProductPipeline,
        IPipeline<Product> deleteProductPipeline)
    {
        _securityService = securityService;
        _productDefinitionRepository = productDefinitionRepository;
        _productRepository = productRepository;
        _saveProductPipeline = saveProductPipeline;
        _deleteProductPipeline = deleteProductPipeline;
    }
Now that we have all the dependencies in place, we can load up the data needed:
    private void BindView()
    {
        View.Product = _productRepository.Select(new SingleProductQuery(View.ProductId)).Single();
    }
We now have the first part of our new editor ready. Now we need to create the actual pages and tabs.
Implementing a New Admin Page
The first thing we'll do here is adjust the markup of our page so it has a masterpage file from ´UCommerceAdmin.Master´. It is a relative path we need to set in the page declaration with the tag MasterPageFile like so:
<%@ Page Language="C#" MasterPageFile="../MasterPages/UCommerceAdmin.Master" AutoEventWireup="true" CodeBehind="EditProduct.aspx.cs" Inherits="UCommerce.Web.UI.Catalog.EditProduct" EnableEventValidation="false" ValidateRequest="false" %>
This also gives us the requirement to have asp:content tag as the root tag in our page.
<asp:Content runat="server" ContentPlaceHolderID="ContentArea"/>
We'll leave our page with those two tags as the only thing in our page since we have another tool that will wire everything up eventually, as described in the first section. Our page markup will look like this:
    <%@ Page Language="C#" MasterPageFile="../MasterPages/UCommerceAdmin.Master" AutoEventWireup="true" CodeBehind="EditProduct.aspx.cs" Inherits="UCommerce.Web.UI.Catalog.EditProduct" EnableEventValidation="false" ValidateRequest="false" %>
    <asp:Content runat="server" ContentPlaceHolderID="ContentArea"/>
The first thing you need to be aware of is that the admin page it self does not contain any ui components at all. It also contains close to no logic at all. The first thing we must do is create a new web form page EditProduct in our solution and derrive from EnsuredPresentedPage<EditProductPresenter, IEditProductView>, IEditProductView, ITabView and INamed
We derrive from the said interfaces to support:
-
IEditProductView
- Gives us the ability to access the data that we need in our tabs (or the page itself.)
-
ITabView
- Allows us to hook up tabs for our editor
-
INamed
- Allows us to specify and edit the name of the business object at the header of the page
-
EnsuredPresentedPage
- An abstract class that besides taking care of wiring up the events in the right order, takes care of security and a bunch of other stuff.
Implementing INamed
To support being able to edit or show the name in the header of the content editor, we must implement INamed on our EditProductPage. The methods Get and Set will be called at the right time by the framework when saving and when rendering so our implementation only needs to show and set the appropriate name. In this case it is the name of the product we want to change:
    public class MyPage : IEditProductView ,Ucommerce.EntitiesV2.INamed, ITabView
    {
        public string Name
        {
            get { return Product.Name; }
            set { Product.Name = value; }
        }
Implementing ITabView
To support tabs, the name field and save and delete buttons we must implement ITabView. This gives us a single method "InitializeTabView" that we must implement. This implementation looks the same across all our editors since the only thing that varies is the save and delete methods in case they should be implemented. If save and delete are not supported, we can pass null instead of the save and delete methods. We have a standard tool that can create the view for us, ITabViewBuilder. We need to resolve that since our page is not part of the dependency injection container. The implementation will now look like this:
    private void SaveButton_Clicked(object sender, ImageClickEventArgs e)
    {
        var args = new EntityCommandEventArgs<Product>(Product);

        Saving(sender, args);
        Save(sender, args);
        Saved(sender, args);
    }

    private void DeleteButton_Clicked(object sender, ImageClickEventArgs e)
    {
        var args = new EntityCommandEventArgs<Product>(Product);

        Deleting(sender, args);
        Delete(sender, args);
        Deleted(sender, args);
    }

    public Control InitializeTabView()
    {
        var builder = ObjectFactory.Instance.Resolve<ITabViewBuilder>();

        return builder.BuildTabView(this, SaveButton_Clicked, DeleteButton_Clicked);
    }
Implementing Save and Delete methods
Since our product editor needs to support both save and delete, we must implement those methods as well. The idea behind the save and delete methods is to fire the events hooked up in the presenter.
Adding tabs to your editor
To add new tabs to your editor, Please refer to Create new tabs for existing editors