
Setup Ucommerce to Include PayPal as a Payment Method
Ucommerce comes with built-in support for PayPal using Website Payments Standard for authorizing new payments and Website Payments Pro for capturing, voiding, and refunding payments in the backend. This guide will walk you through getting Ucommerce to work with PayPal for payment processing.
Authorization is available for all plans with PayPal. If you wish to acquire (capture), refund, or cancel payments PayPal requires you to upgrade your account to either Premier or Business.
Settings in Ucommerce
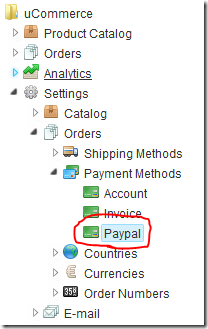
Add a new payment method, under “Ucommerce –> Settings –> Orders –> Payment Methods”. You can call it whatever you like, here I have used “Paypal”.
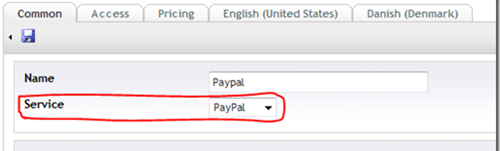
Click the newly created node and selected “PayPal” in the Service drop down list. Fill out the rest of the required information, like where it’s available from under the “Access” tab, pricing and the language tabs. When you are done click “Save”.
That’s everything in the Ucommerce interface.
Settings in PayPal Administration Panel
Optional: Encrypted Website Payments
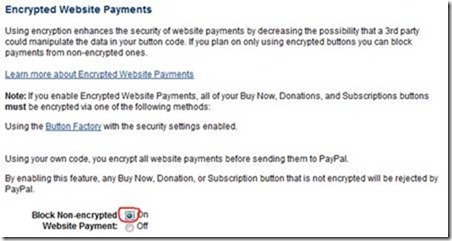
We recommend that “Encrypted Website Payments” is used, so the data sent to PayPal can’t be tampered with. This are some steps involved but again, it’s a security risk not to use this feature.
Getting OpenSSL for windows
OpenSSL is an open source tool for Windows, which is used to generate certificates. You will need to install it to generate the PayPal encryption certificates. Visit http://www.slproweb.com/products/Win32OpenSSL.html and download ”Win32 OpenSSL Light”.
Generating the keys
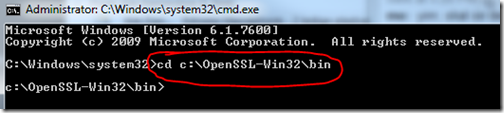
Open a command prompt and go to the bin directory under the installation directory.
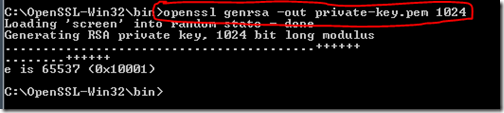
To create the private certificate type: “openssl genrsa –out private-key.pem 1024” and press [Enter].
For the public certificate type: “openssl req –new –key private-key.pem –x509 –days 365 –out public-cert.pem”
Now it will ask you to enter some information, you can just skip them by pressing [Enter].
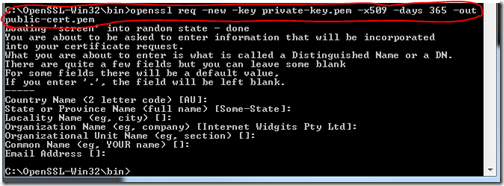
Now we need to create the p12 file. Type the following in the prompt: “openssl pkcs12 –export –in public-cert.pem –inkey private-key.pem –out my_pkcs12.p12” followed by [Enter].

Uploading the public key to PayPal
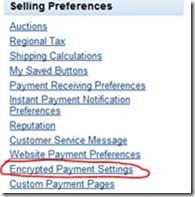
Log into PayPal and go to the profile settings.

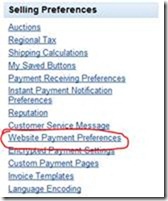
Click the “Encrypted Payment Settings”.
Start by downloading the “PayPal Public Certificate” by clicking the download button marked with number 1. Next click the “Add” button marked number 2 on the page.
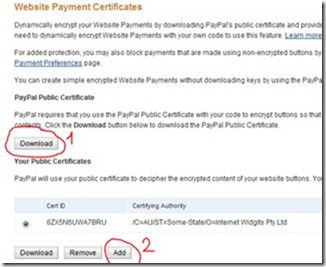
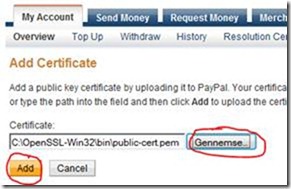
Select the file and click “Add”.
Copying the certificates
In the previously step you create 3 files and downloaded 1:
· paypal_cert_pem.txt – downloaded – PayPal public certificate
· private-key.pem – created – private key
· public-cert.pem – created – public key
· my_pkcs12.p12 – created – p12 exchange key
Copy the files to a directory where your Ucommerce installation can get access to them. You will most likely have installed umbraco under: “C:\inetpub\umbraco”. A good place for them would be in the Ucommerce configuration directory would be: “C:\inetpub\umbraco\umbraco\UCommerce\Configuration” together with the PayPal.config file.
Rejecting unencrypted messages
Log into the PayPal administration panel and click on “Profile”.
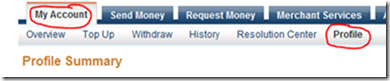
On the profile page click the “Website Payment Preferences”.
Scroll down to “Encrypted Website Payments” and make sure the radio button “Block Non-encrypted” are selected. Scroll down to the button and click “Save”.
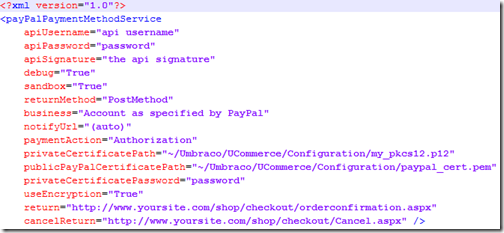
Editing the PayPal.config File
Now we need to edit the PayPal.config file.
You will find the PayPal.config file in the following location, where “rootdir” is the directory on the computer where you installed Umbraco: “rootdir\umbraco\UCommerce\Configuration\PayPal.config”. Usually “rootdir” is c:\inetpub.
Some of the below information are found in the PayPal administration panel, so start by logging in if you haven’t done so already.
Optional: Finding privateCertificatePath, publicPayPalCertificatePath, privateCertificatePassword and useEncryption
If you earlier in this guide turned “Encrypted Website Payments” on, this step needs to be completed.
privateCertificatePath and publicPayPalCertificatePath
If you used the default names earlier in this guide, path of the two files should work out of the box. If you customized them, reflect the changes here.
privateCertificatePassword
Password entered when you created the p12 file. This can be an empty password, but recommended with a password if you are on a shared host.
useEncryption
Set this to “True” used you are using “Encrypted Website Payments”.
Optional: Finding apiUsername, apiPassword, and apiSignature
apiUsername, apiPassword, and apiSignature are all used to access the PayPal remote API to do Acquire, Refund, and Cancel.
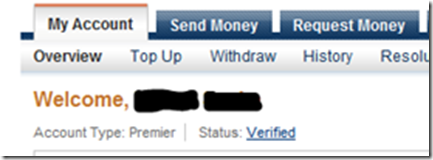
Log into you PayPal account and make sure your account is verified.
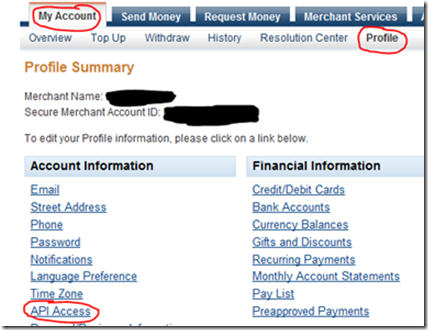
Click on “My Account”, then “Profile” and at last “API Access”
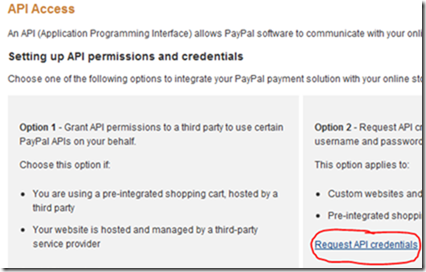
On the “API Access” page, Click the “Request API credentials” link.
Make sure “Request API signature” is selected, and then click the “Agree and Submit” button.
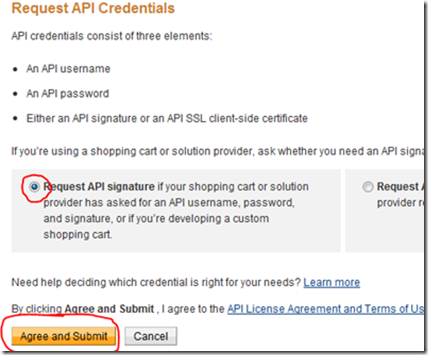
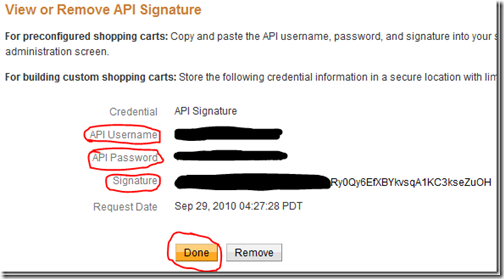
Here you will find the “API Username”, “API Password” and “Signature”.
Finding debug
If set to “True”, it will prompt you to click a button before posting the information to “PayPal” otherwise it will do an autosubmit. When running in production, you will have this set to “False”.
Finding sandbox
If testing the ingration with a developer account set this to “True” otherwise “False” at a production site.
Finding returnMethod
Leave it at default.
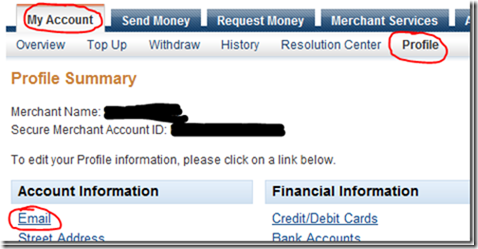
Finding business
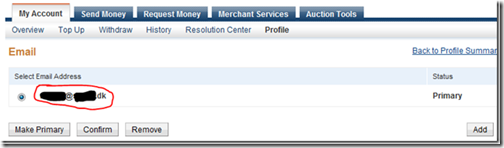
Next we need to find your PayPal ID or an email address associated with your PayPal account. Again, click on “My Account”, then “Profile” and then “Email”.
Here you can see your “Business” account name. Its usually your email address used, when you signed up for the PayPal account. I have only one, but you could have multiple.
Finding notifyUrl
Leave this at “(auto)” if in doubt.
Finding paymentAction
What paymentaction to take.
· Sale - Finale sale, instant capture.
· Authorization - Authorization for a final sale, to be captured later.
· Order - Just place the order, but authorize & capture later. In most cases you you want “Authorization”.
Finding return
Url the user is returned to after successfully authorizing her credit card.
Finding cancelReturn
Url the user is returned to if she cancels a purchase.
Excecuting a pipeline on callback
Running a pipeline once payment is authorized can be helpful if you need to complete the order once the customer returns to your site.
To run a “pipeline” once the callback if received and processed, you need to modify the database. If you used the name “PayPal” for the payment method name, you can run this SQL query in the SQL Server Management Studio.
UPDATE Ucommerce_PaymentMethod SET Pipeline = 'Checkout' WHERE Name = 'PayPal'
or just edit it manually in SQL Server Management Studio.

Now the default piplline that comes with Ucommerce will be run after each successful callback. This sets the Basket to an Order, gives it an OrderNumber, and other things.
Optional: Enable Acquire, Cancel, and Refund in Ucommerce Back Office
To be able to acquire, cancel, and refund payments you need to enable two pipeline tasks in the ToCompletedOrder pipeline and ToCancelled pipeline.
The pipeline configuration is found in /umbraco/ucommerce/pipelines.
ToCancelled.config
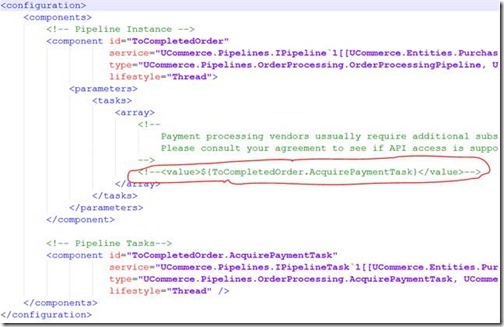
ToCompletedOrder.config

FAQ
· Test mode – Make sure test mode if turned off when going live.
· Environment – Make sure this setting is set to “Live” when in production.