
Setup Ucommerce to include OGone as a Payment Method
Ucommerce comes with built-in support for Ogone payments. This guide will walk you through getting Ucommerce to work with Ogone for payment processing.
With the Ogone payment provider you can do authorization of payments, instant acquire, acquire and perform refunds both via our automatic Ucommerce solution and manually via the back-end office of your Ogone subscription.
Settings in Ucommerce
Add a new payment method, under “Ucommerce à Settings à Orders à Payment Methods”, by right clicking the “Payment Methods” leaf and use “Create”. You can use any name you like; I have used “Ogone”.
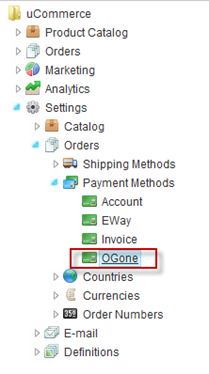
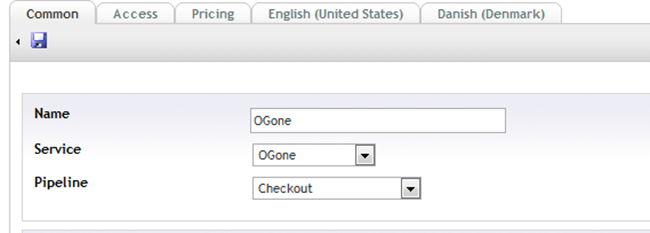
Now we’re ready to configure your new payment method. Click the newly created node and select “Ogone” in the Service drop down list and select “Checkout” in the pipeline drop down list. Remember to fill out the rest of the required information in the rest of the Tabs.
When you’re done, click the save icon. That’s everything in the Ucommerce interface.
Settings in Your Back-end Office at Ogone
First you need to log in with your “pspid” and password.
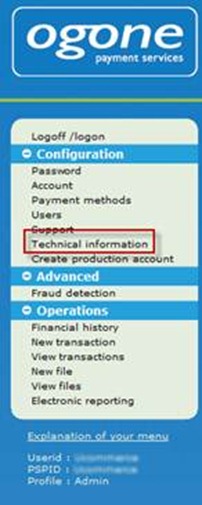
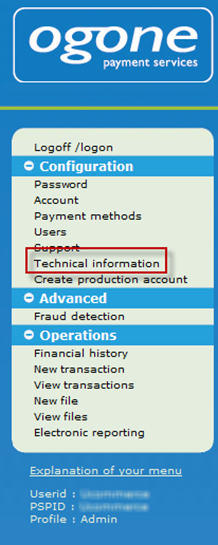
Click “Technical information” at the menu to the left of the page. At the center screen 7 tabs is displayed. Use the settings as used on the screenshots representing each tab.
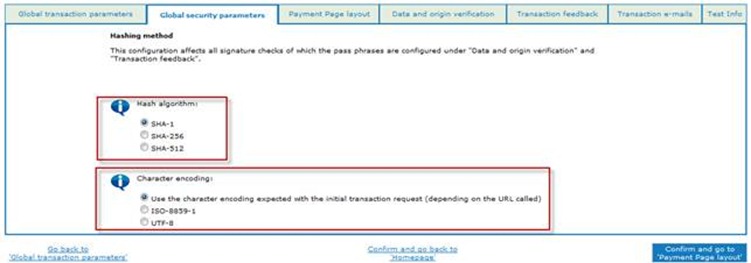
- Global Security Parameters
Set the first hash algorithm to SHA-1 as our system uses this hash algorithm for payment requests and maintenance requests.
Set the character encoding to the first option.
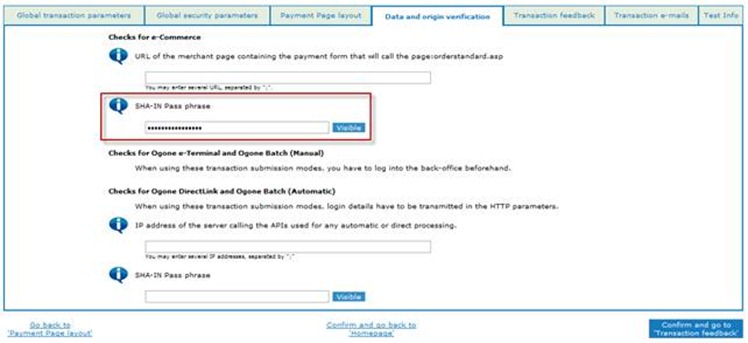
- Data and origin verification
You need a password in this field. This password is used in the communication between your Ucommerce shop and Ogone payment provider for security reasons. This pass phrase is used when the system requests a payment at Ogone.
The password must follow rules given by Ogone. Press the blue information button for information regarding those rules.
- Transaction feedback
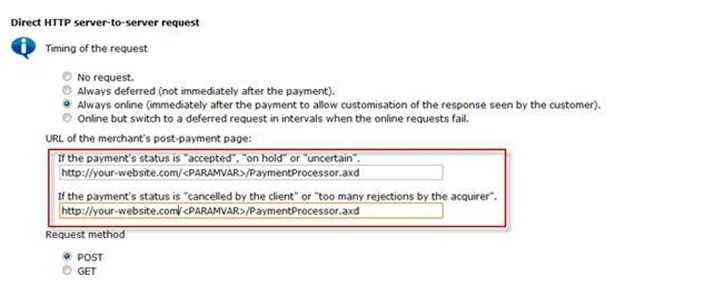
The first four URLs in the “http redirection in the browser” section can be left blank, as we configure this in our configuration file later on.
The next step is to link from the secure payment page to your page which processes the payment.
Please note that “/
Next step is to tell Ogone which parameters they need to send back to our site. There’s quite a few available, just select them all. This is a good idea as that information is logged, should any problem occur, problem solving is made a lot easier.
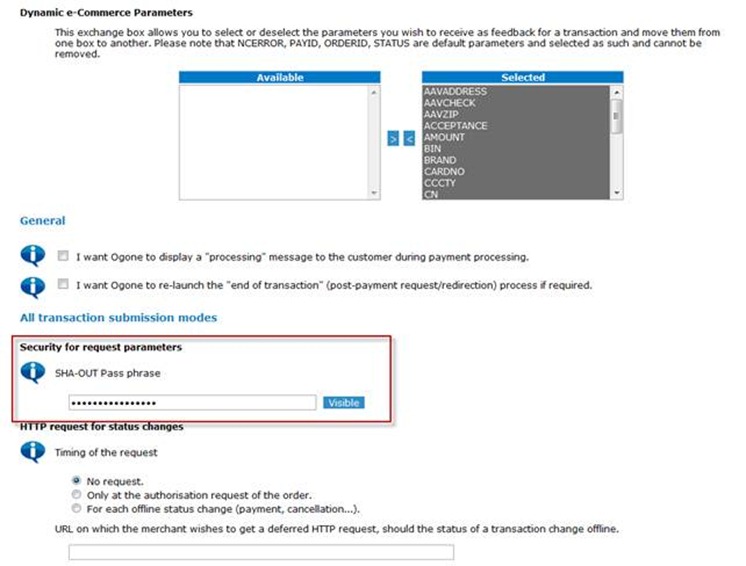
The last part in this section is to put in the SHA-OUT pass phrase. This is the same method as before but for security reasons you should use another phrase this time.
When Ogone makes the callback to our server, this pass phrase is used in a hash algorithm in order to test for corrupt requests.
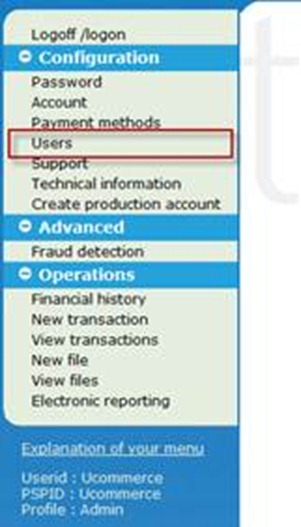
Now we need to make an “admin without user management” but with access rights to make direct link requests.
Click Users at the back end office menu to the left and click new users in that section.
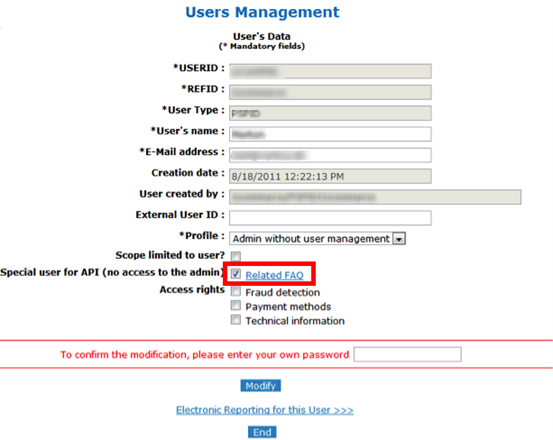
Fill out the required fields and put your PSPID password in the password field and click create. At the next page you’ll get a password.
Now we need to change the password to something that doesn’t contain special characters (use “a-z” and/or “0-1”.
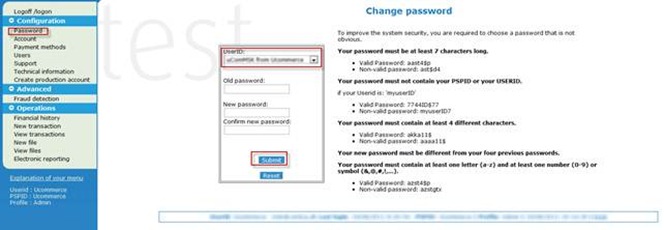
Under the password section, simply select the user you’ve just created and put in the old password and together with the new you want and click submit.
This is it in the back-end office at your configuration.
Configuring Acquire and Cancel Payments
The Ogone payment provider comes with the ability to do automatic acquire and cancel payments. In order to make this work you need to enable a pipeline task.
The pipeline configuration is found in /umbraco/ucommerce/pipelines.
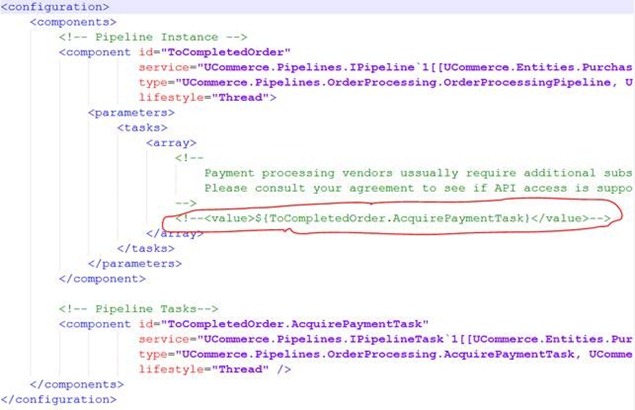
Simply remove “” at the highlighted line. These are HTML comment sections.
Configuring the “Ogone.config” File
Now we need to edit the ”Ogone.config” file in order to match your environment.
You’ll find the configuration file at “rootdir\umbraco\UCommerce\Configuration\Ogone.config” where rootdir is the location on your computer, where Umbraco is installed.
Some values need to be found in the back-end office. All of those can be found under technical information.
Parameter list for the configuration file:
pspid
The pspId of your Ogone account.
Find it at the bottom of the menu to the left at the back-end office.
Userid
The Userid of the user you’ve just made.
Password
The password for the user you’ve just made.
acceptUrl
The URL the customer is redirected to after an accepted payment.
cancelUrl
The URL the customer is redirected to after a canceled payment.
backUrl
The URL the customer is redirected to if the customer clicks the back button on the payment page.
declineUrl
The URL the customer is redirected to if the payment is declined.
exceptionUrl
The URL the customer is redirected to if a problem occours in the payment process .
All the urls are a local webs in your website such as “yourshop.com/orderconfirmation.aspx”.
Debug
Tells the system whether this is in debug mode. This should be set to false.
shaSignOut
The shaSign used when Ogone redirects to the payment processor.
Under technical information, go to the bottom of the “transaction feedback” tab to find the SHA-OUT pass phrase
shaSignIn
The shaSign used when your Ucommerce website requests a payment at Ogone.
Under technical information, go to the “Data and origin verification” tab to find the SHA-IN pass phrase
language
Must follow the right language codes otherwise it’s set to the default value “en_US”.
instantAcquire
Is set to “true” if you want instant acquire.
Is set to “false” if you want to only authorize a payment.
testMode
Tells the system whether this is in test mode. This should be set to false.
Congratulations - your website now includes payments with the Ogone payment provider.