
Setup Ucommerce to Include DIBS as a Payment method
Ucommerce comes with built-in support for DIBS payments. This guide will walk you through getting Ucommerce to work with DIBS for payment processing.
Authorization is available for all plans with DIBS. If you wish to acquire (capture), refund, or cancel payments DIBS requires you to purchase the “Integration(API)” add-on.
Settings in Ucommerce
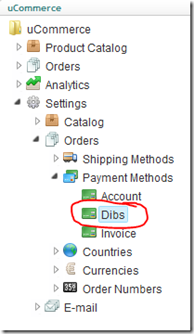
Add a new payment method, under “Ucommerce –> Settings –> Orders –> Payment Methods”. You can call it whatever you like, here I have used “DIBS”.
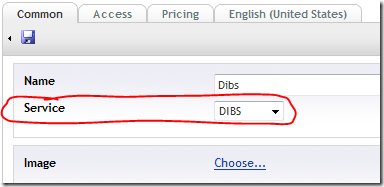
Click the newly created node and select “DIBS” in the Service drop down list. Fill out the rest of the required information, like where it’s available from under the “Access” tab, pricing and the language tabs. When you are done click “Save”.
That’s everything in the Ucommerce interface.
Settings in DIBS Administration Panel
Changes needed in the DIBS administration panel, so it will work with Ucommerce.
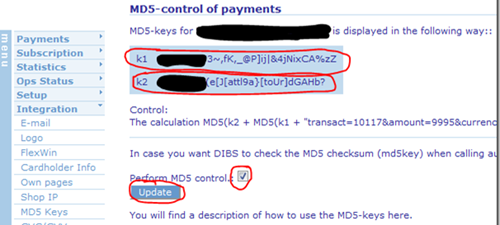
Configure MD5 Control Setting
On the Menu on the left side, click “Integration –> MD5 Keys”. Make sure that “Perform MD5 control” is checked. If not, check it and click “Update”.

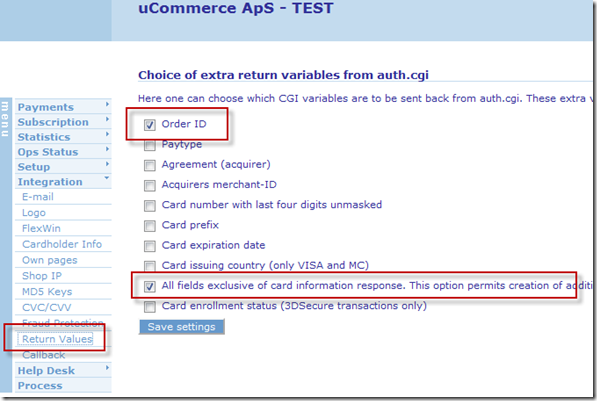
Configure Return Values
Ucommerce performs validation of the payment information when DIBS performs the callback. To verify that the payment wasn’t tampered with you’ll need to configure DIBS to include some additional information as part of the callback.
Editing the DIBS.config File
Now we need to edit the DIBS.config file.
You will find the DIBS.config file in the following location, where “rootdir” is the directory on the computer where you installed Umbraco: “rootdir\umbraco\UCommerce\Configuration\DIBS.config”. Usually “rootdir” is c:\inetpub.
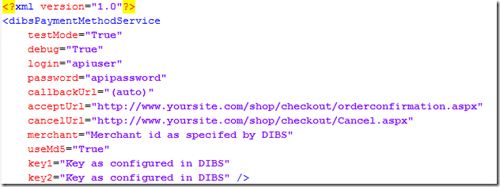
Some of the below information are found in the DIBS administration panel, so start by logging in you aren’t already.
Finding testMode
If set to “True”, test mode is enabled and you can that it works. Test credit card information from DIBS can be found here: 5. Your own test.
Finding debug
If set to “True” you will be prompted to click a button before posting the information to “DIBS” otherwise it will do an autosubmit using Javascript. When running in production, you will want this set to “False”.
Finding login
Used if you want to use the remote API to do authorization, capture and cancel. This is the same login used for the DIBS administration panel
Finding password
Only used when doing remote API. This is the password used when logging into the DIBS administration panel
Finding callbackUrl
Leave this at “(auto)” if in doubt.
Finding acceptUrl
Url the user is returned to after successfully authorizing her credit card.
Finding cancelUrl
Url the user is returned to if she cancels a purchase.
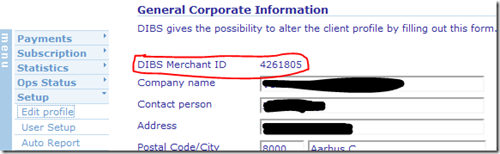
Finding merchant
On the Menu on the left, click “Setup –> Edit profile”, here you will find the Merchant ID.
Finding useMd5
True/False indicating whether to use Md5. Its recommended to use Md5 for security reasons.
Finding key1 and key2
The two keys found in the administration panel. On the Menu on the left, click “Integration –> MD5 Keys”, here you will find k1 and k2 which correspond to key1 and key2. Also make sure that “Perform MD5 control” are checked. If not, mark it and click “Update”.
Please note that the configuration files are subject to standard XML limitations. If your MD5 key contains the following characters they must be HTML encoded for .NET to be able to read the value:

Excecuting a Pipeline on Callback
Running a pipeline once payment is authorized can be helpful if you need to complete the order once the customer returns to your site.
To run a “pipeline” once the callback if received and processed, you need to modify the database. If you used the name “DIBS” for the payment method name, you can run this SQL query in the SQL Server Management Studio.
UPDATE Ucommerce_PaymentMethod SET Pipeline = 'Checkout' WHERE Name = 'DIBS'
or just edit it manually in SQL Server Management Studio.

Now the default pipeline that comes with Ucommerce will be run after each successful callback. This sets the Basket to an Order, gives it an OrderNumber, and other things.
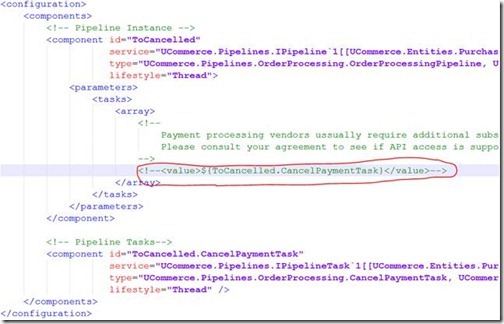
Optional: Enable Acquire, Cancel, and Refund in Ucommerce Back Office
To be able to acquire, cancel, and refund payments you need to enable two pipeline tasks in the ToCompletedOrder pipeline and ToCancelled pipeline.
The pipeline configuration is found in /umbraco/ucommerce/pipelines.
ToCancelled.config
ToCompletedOrder.config

FAQ
· Test mode – Make sure test mode if turned off when going live.